티스토리 뷰
1. 리액트 컴포넌트를 상속한 리액트 클래스는 리액트 컴포넌트의 라이프 사이클을 그대로 사용할 수 있게 된다.
1-1 라이프 사이클은 클래스가 생성되어 삭제될 때까지 리액트가 내부적으로 호출하는 컴포넌트의 메소드들이다.
1-2 가장 많이 사용되는 메소드는 componentDidMount, componentDidUpdate, componentWillUnmount 정도 이다.
1-3 3가지의 단계로 나눌 수 있는데
1-3-1 Mounting
1-3-1-1 constructor, getDerivedStateFromProps, render, componentDidMount 순서로 호출된다.
1-3-2 Updating
1-3-2-1 getDerivedStateFromProps, shouldComponentUpdate, render,
1-3-2-2 getSnapshotBeforeUpdate, componentDidUpdate 순서로 호출된다.
1-3-3 Unmounting
1-3-3-1 componentWillUnmount
1-3-4 Error Handling - render나 라이프사이클 메소드나 자식 컴포넌트의 생성자에서 에러가 발생한 경우 실행
1-3-4-1 getDerivedStateFromError, componentDidCatch
1-4 여기서는 지난 포스트에 이어 componentDidMount, componentDidUpdate를 사용하여 상태를 브라우저에 저장하는 예제를 가지고 설명한다.
1-4-1 componentDidMount는 해당 컴포넌트가 처음 생성될 때 실행되고 로컬저장소에서 값을 읽어온다.
1-4-1-1 여기서 주의할 점은 예제는 JSON 형식으로 저장하고 있는데, 이렇게 하는게 편리하다.
1-4-2 componentDidUpdate는 내부상태가 변경될 때 마다 실행되는데, 아래는 todos의 개수가 다르면 저장한다.
1-4-3 TodoList에서 props으로 받은 todos를 확인하여 데이터가 하나도 없는 경우는 No Item Exists가 표출된다.
1-4-4 AddTodo에서 입력한 값이 정상적으로 저장된 경우에는 input element의 내용을 초기화 하고 있다.
class TodoApp extends React.Component {

  constructor(props) {
    super(props)

    this.onRemoveAllClicked = this.onRemoveAllClicked.bind(this)
    this.onNextTodoClicked = this.onNextTodoClicked.bind(this)
    this.handleAddTodo = this.handleAddTodo.bind(this)

    this.state = {
      todos: [
        "Take your mask",
        "Wash your hands",
        "Drink more water"
      ]
    }
  }

  componentDidMount() {
    try {
      const todos = localStorage.getItem("todos")
      if (todos) {
        console.log(todos)
        this.setState(() => ({ todos: JSON.parse(todos) }))
      }
    } catch (e) {
    }
  }

  componentDidUpdate(prevProps, prevState) {
    if (prevState.todos.length !== this.state.todos.length) {
      localStorage.setItem("todos", JSON.stringify(this.state.todos))
    }
  }

  onRemoveAllClicked() {
    this.setState(() => {
      return {
        todos: []
      }
    })
  }

  onNextTodoClicked() {
    const index = Math.floor(Math.random() * this.state.todos.length)
    alert(this.state.todos[index])
  }

  handleAddTodo(todo) {
    if (!todo) {
      return 'Please type vaild item'
    } else if (this.state.todos.indexOf(todo) > -1) {
      return 'Duplicated item typed'
    }

    this.setState((prevState) => {
      return {
        todos: prevState.todos.concat(todo)
      }
    })
  }

  render() {
    // const title = "TO DO List"

    return (
      <div>
        {/* <Header title={title} /> */}
        <Header />
        <Action
          hasTodos={this.state.todos.length > 0}
          onNextTodoClicked={this.onNextTodoClicked}
        />
        <TodoList
          hasTodos={this.state.todos.length > 0}
          todos={this.state.todos}
          onRemoveAllClicked={this.onRemoveAllClicked}
        />
        <AddTodo handleAddTodo={this.handleAddTodo} />
      </div>
    )
  }
}


const Header = (props) => {
  return (
    <div>
      <h1>{props.title}</h1>
    </div>
  )
}

Header.defaultProps = {
  title: 'Your Todo List'
}

const Action = (props) => {
  return (
    <div>
      <button
        onClick={props.onNextTodoClicked}
        disabled={!props.hasTodos}
      >Next Todo?</button>
    </div>
  )
}

const TodoList = (props) => {
  return (
    <div>
    <button
      onClick={props.onRemoveAllClicked}
      disabled={!props.hasTodos}
    >Remove All</button>
    { props.todos.length === 0 && <p>No Item exists</p> }
    { props.todos.map(todo => <Todo key={todo} todoText={todo} />) }
    </div>
  )
}

const Todo = (props) => {
  return (
    <div>
      <p>
        {props.todoText}
      </p>
    </div>
  )
}

class AddTodo extends React.Component {

  constructor(props) {
    super(props)

    this.onFormSubmit = this.onFormSubmit.bind(this)

    this.state = {
      error: undefined
    }
  }

  onFormSubmit(e) {
    e.preventDefault()
    const typedTodo = e.target.elements.newTodo.value

    const error = this.props.handleAddTodo(typedTodo)

    this.setState(() => {
      return {
        error
      }
    })

    if (!error) {
      e.target.elements.newTodo.value = ''
    }
  }

  render() {
    return (
      <div>
        {this.state.error && <p>{this.state.error}</p>}
        <form onSubmit={this.onFormSubmit}>
          <input type="text" name="newTodo" />
          <button>Add</button>
        </form>
      </div>
    )
  }
}

ReactDOM.render(<TodoApp />, document.getElementById('app'))
2. LocalStorage는 브라우저에 map형식으로 저장하는 기능을 지원한다.
2-1 브라우저를 리프레시할 경우에도 데이터를 유지한다.
2-2 localStorage객체로 접근할 수 있고 setItem으로 데이터를 저장, getItem으로 읽어올 수 있고
2-2-1 removeItem으로 특정 키에 저장된 값을 삭제할 수 있고, clear로 전체데이터를 삭제할 수 있다.
2-3 위의 예제에서는 setItem, getItem만 사용하고 있다.
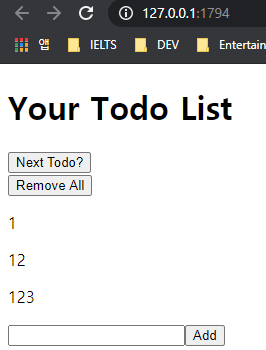
3. 결과화면

'Client Technologies > React' 카테고리의 다른 글
| React : webpack으로 React 개발 자동화하기 (0) | 2020.10.28 |
|---|---|
| React : node package.json scripts 속성 사용하기 (0) | 2020.10.28 |
| React : 함수 컴포넌트, 기본 props 값 설정하기 (0) | 2020.10.26 |
| React : State 사용하기와 부모 컴포넌트 함수 호출 (0) | 2020.10.26 |
| React : React 클래스 이벤트 사용하기 (0) | 2020.10.23 |
- Total
- Today
- Yesterday
- 도커 개발환경 참고
- AWS ARN 구조
- Immuability에 관한 설명
- 자바스크립트 멀티 비동기 함수 호출 참고
- WSDL 참고
- SOAP 컨슈머 참고
- MySql dump 사용법
- AWS Lambda with Addon
- NFC 드라이버 linux 설치
- electron IPC
- mifare classic 강의
- go module 관련 상세한 정보
- C 메모리 찍어보기
- C++ Addon 마이그레이션
- JAX WS Header 관련 stackoverflow
- SOAP Custom Header 설정 참고
- SOAP Custom Header
- SOAP BindingProvider
- dispatcher 사용하여 설정
- vagrant kvm으로 사용하기
- git fork, pull request to the …
- vagrant libvirt bridge network
- python, js의 async, await의 차이
- go JSON struct 생성
- Netflix Kinesis 활용 분석
- docker credential problem
- private subnet에서 outbound IP 확…
- 안드로이드 coroutine
- kotlin with, apply, also 등
- 안드로이드 초기로딩이 안되는 경우
- navigation 데이터 보내기
- 레이스 컨디션 navController
- raylib
- 스프링부트
- 외부파일
- 로그인
- XML
- spring boot
- one-to-many
- jsp
- Many-To-Many
- Angular
- Spring
- mapping
- MYSQL
- Rest
- 설정
- 설정하기
- 하이버네이트
- Spring Security
- Security
- 스프링
- WebMvc
- form
- login
- hibernate
- 상속
- RestTemplate
- Validation
- crud
- 자바
- 매핑
- one-to-one
