티스토리 뷰
-1. 유레카 서버는 마이크로서버스가 등록되는 저장소 같은 곳이다. 유레카 서버는 마이크로서비스의 목록을 저장하고 주기적인 상태체크를 통해 서비스의 정상 유무를 관리한다.
0. 단일 유레카 서버(Standlone Mode)를 사용한다. HA와 리플리카는 고급 주제라서 여기 부터 쓰면 적절하지가 않다. 그걸 하려면 Docker와 Kubernates가 없으면 별로 의미가 없다. 아래는 해당 관련 공식 문서이다.
0-1 그렇기 때문에 Eureka clients는 설정에 포함시키지 않았다. HA구조를 사용하지 않을 거면 DiscoveryServer만 있으면 된다.
0-2 이 포스팅의 목적은 동작하는 Microservice 환경을 구축하는 것이다.
1. 유레카 디스커버리 서버 생성
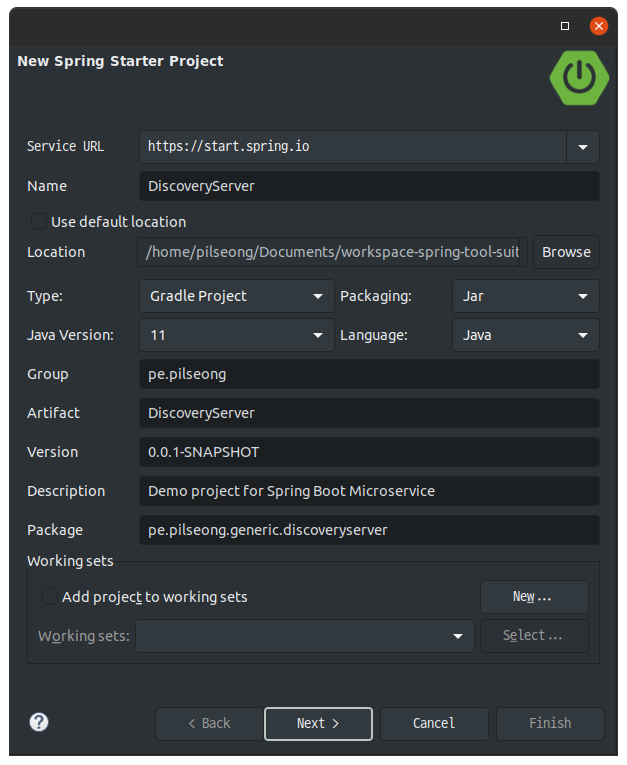
1-1 자바 11기반의 Gradle 프로젝트를 생성하였다.

1-2 기본 스타터는 유레카 서버만 있으면 된다. 유레카 데시보드의 접근제어를 위해서 Spring secure를 적용했다.
1-3 DevTools은 프로그램 수정 시에 자동재기동을 지원한다.

2. application.properties 설정하기
2-0 기본적으로 스프링 공식문서에 지정된 아래의 예시 내용을 사용한다. 아래는 공식문서에서 복사 붙여넣기 한 내용이다.
server:
  port: 8761

eureka:
  instance:
    hostname: localhost
  client:
    registerWithEureka: false
    fetchRegistry: false
    serviceUrl:
      defaultZone: http://${eureka.instance.hostname}:${server.port}/eureka/
2-1 서비스가 많은 마이크로서비스 어플리케이션 작성은 이름설정이 중요하다.
2-1-2 유레카 등록 시에 기본 구분자로 사용되는데 Eureka service ID의 기본값이 된다.
2-2 아래의 설정이 서버에 적용한 내용이다. 포트는 공식문서나 기본설정으로 사용되는 8761 포트로 설정했다.
2-3 spring.security 부분은 스프링 security 설정 부분이다. 지정된 name과 password로 유레카 대시보드에 들어갈 수 있다.
2-3-1 나중에 암호화 해서 설정파일에 저장하는 방법으로 변경할 예정이다.
2-4 제일 중요한 아래 4가지는 필수항목들인데, 없으면 돌아가지가 않는다. 클라이언트를 사용하지 않아도 설정해야 동작한다.
2-4-1 첫번째는 접속대상 서버의 url이다. 정확히 말하면 timezone에 따른 접속서버 목록인데, 여기서는 단독서버로 사용한다.
2-4-2 두번째는 현재 서버가 클라이언트로 유레카 서버에 등록되어야 하는지 여부
2-4-3 세번째는 fetch-registry는 유레카 서버에서 등록 정보를 수신할지를 지정한다.
2-4-4 마지막은 유레카 서버가 hostname 대신에 ip-address를 advertise하도록 설정하는 부분이다. --> 빠진부분
2-4-4-5 여기서는 ip를 사용하기 때문에 없으면 동작하지 않는다.
spring.application.name=discoveryserver
server.port=8761

spring.security.user.name=admin
spring.security.user.password=admin

eureka.instance.hostname=localhost
eureka.client.service-url.defaultZone=http://${eureka.instance.hostname}:${server.port}/eureka/
eureka.client.register-with-eureka=false
eureka.client.fetch-registry=false
eureka.instance.prefer-ip-address=true
3. 소스 작성 - @EnableEurekaServer를 클래스에 추가한다. 없으면 동작하지 않는다.
package pe.pilseong.generic.discoveryserver;

import org.springframework.boot.SpringApplication;
import org.springframework.boot.autoconfigure.SpringBootApplication;
import org.springframework.cloud.netflix.eureka.server.EnableEurekaServer;

@SpringBootApplication
@EnableEurekaServer
public class DiscoveryServerApplication {

	public static void main(String[] args) {
		SpringApplication.run(DiscoveryServerApplication.class, args);
	}

}
3-1 Spring Security 설정하기
3-1-1 Spring Security는 기본적으로 모든 request에 cross site request forgery(CSRF)를 방지하기 위한 토큰을 요청하므로
3-1-2 /eureka/** 경로로 들어오는 모든 request에 대해 csrf를 disable해야 한다.
3-1-3 나는 JWT를 사용할 것이기에 그냥 전체를 disabled 하였다.
https://cloud.spring.io/spring-cloud-netflix/reference/html/#securing-the-eureka-server
3-1-4 WebSecurityConfigurerAdapter의 configure(HttpSecurity http)는 http로 오는 request에 대한 보안정책을 설정하는 곳
package pe.pilseong.generic.discoveryserver.conig;

import org.springframework.security.config.annotation.web.builders.HttpSecurity;
import org.springframework.security.config.annotation.web.configuration.EnableWebSecurity;
import org.springframework.security.config.annotation.web.configuration.WebSecurityConfigurerAdapter;

@EnableWebSecurity
public class WebSecurityConfig extends WebSecurityConfigurerAdapter {

  @Override
  protected void configure(HttpSecurity http) throws Exception {
    http.csrf().disable();
    // super.configure(http); 여기에 이 코드가 있으면 유레카 서버에 주기적으로 에러가 발생한다.
    // Batch update failure with HTTP status code 401
  }
}
4. 테스트
4-1 유레카 대시보드로 들어간다. 그러면 아래처럼 Spring Security로 설정된 로그인 화면이 나온다. 위에 넣은대로 admin/admin

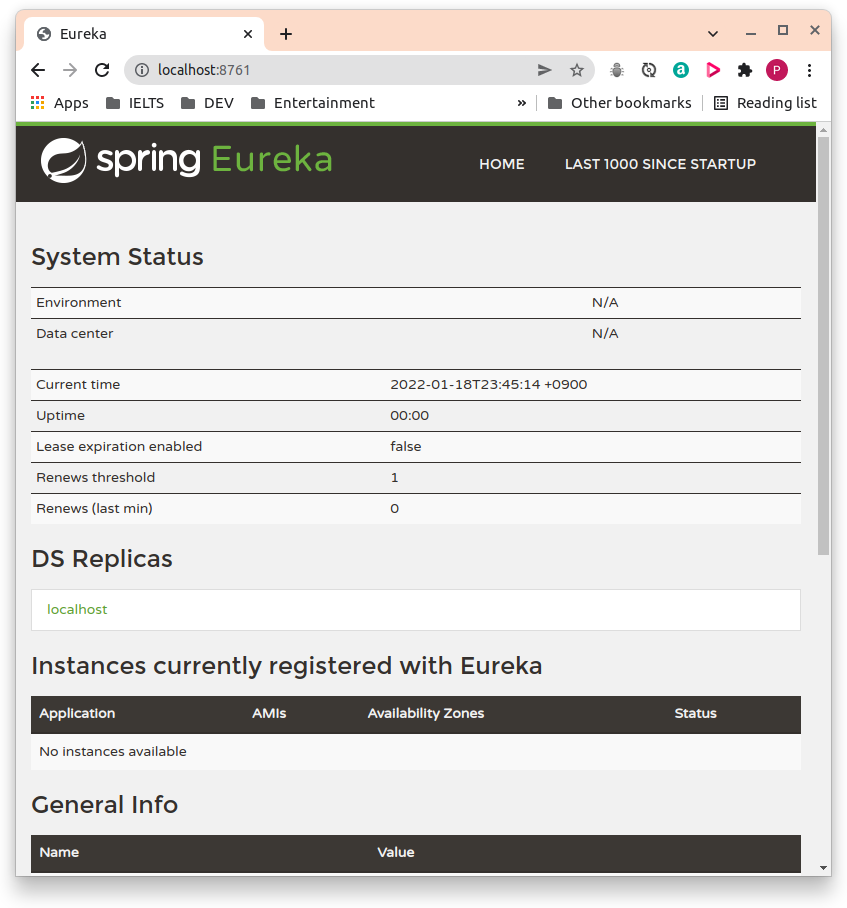
4-2 아래처럼 로그인되어 대쉬보드가 나오게 된다. 빨간 볼드체로 경고가 나올 때도 있는데 시간이 지나면 사라진다.

'Spring > Microservice' 카테고리의 다른 글
| Microservice : Spring Cloud Gateway 서버 생성 (0) | 2022.01.18 |
|---|---|
| Microservice : 기본적인 구조 작성 (0) | 2022.01.17 |
- Total
- Today
- Yesterday
- 도커 개발환경 참고
- AWS ARN 구조
- Immuability에 관한 설명
- 자바스크립트 멀티 비동기 함수 호출 참고
- WSDL 참고
- SOAP 컨슈머 참고
- MySql dump 사용법
- AWS Lambda with Addon
- NFC 드라이버 linux 설치
- electron IPC
- mifare classic 강의
- go module 관련 상세한 정보
- C 메모리 찍어보기
- C++ Addon 마이그레이션
- JAX WS Header 관련 stackoverflow
- SOAP Custom Header 설정 참고
- SOAP Custom Header
- SOAP BindingProvider
- dispatcher 사용하여 설정
- vagrant kvm으로 사용하기
- git fork, pull request to the …
- vagrant libvirt bridge network
- python, js의 async, await의 차이
- go JSON struct 생성
- Netflix Kinesis 활용 분석
- docker credential problem
- private subnet에서 outbound IP 확…
- 안드로이드 coroutine
- kotlin with, apply, also 등
- 안드로이드 초기로딩이 안되는 경우
- navigation 데이터 보내기
- 레이스 컨디션 navController
- raylib
- Rest
- Spring Security
- login
- 설정하기
- 매핑
- Many-To-Many
- RestTemplate
- Security
- mapping
- one-to-many
- hibernate
- crud
- 스프링부트
- one-to-one
- 상속
- MYSQL
- Angular
- spring boot
- 자바
- form
- 하이버네이트
- jsp
- 스프링
- 외부파일
- WebMvc
- 설정
- XML
- Validation
- 로그인
- Spring
