
티스토리 뷰
Spring Security : Web MVC + Security + JDBC 으로 인증 구현하기
Korean Eagle 2020. 5. 17. 23:450. 이 포스트는 이전 Spring : Web MVC + Spring 시리즈의 연속이다.
1. 이 포스트는 in-Memory 인증에서 MySql(JDBC)을 이용한 인증으로 프로그램을 변경하는 내용이다.
1-1 in Memory 인증은 아래 링크한 포스트의 제일 마지막 부분에 in-memory 인증 설정부분을 참조한다.
Spring Security : Web MVC + Security with Java Config 설정하기
1. 이젠 xml 설정 같은 건 사용하지 않는다. Spring WebMVC with Java Config(no XML) 2. web.xml을 사용하지 않으려면 maven pom에 maven-war-plugin이 있어야 한다. 2-1 org.apache.maven.archetype webapp 1.4..
kogle.tistory.com
2. 기본적으로 스프링 Seucirty는 로그인을 위해 지정된 테이블 스키마를 정의하고 있다.
2-0 spring security의 기본 스키마
2-0-1 users 스키마
create table users(
    username varchar_ignorecase(50) not null primary key,
    password varchar_ignorecase(500) not null,
    enabled boolean not null
);

create table authorities (
    username varchar_ignorecase(50) not null,
    authority varchar_ignorecase(50) not null,
    constraint fk_authorities_users foreign key(username) references users(username)
);
create unique index ix_auth_username on authorities (username,authority);
2-0-2 groups 스키마
create table groups (
    id bigint generated by default as identity(start with 0) primary key,
    group_name varchar_ignorecase(50) not null
);

create table group_authorities (
    group_id bigint not null,
    authority varchar(50) not null,
    constraint fk_group_authorities_group foreign key(group_id) references groups(id)
);

create table group_members (
    id bigint generated by default as identity(start with 0) primary key,
    username varchar(50) not null,
    group_id bigint not null,
    constraint fk_group_members_group foreign key(group_id) references groups(id)
);
2-1 개발자는 이 스키마 정의에 데이터베이스를 생성해야 한다.
2-2 스프링 Security은 이렇게 생성한 데이테베이스를 사용하여 인증하는 모든 서비스를 제공한다.
2-3 따라서 개발자가 할일은 설정과 데이터베이스 생성 정도라고 할 수 있다.
2-4 기본 테이블 스키마는 커스터마이즈가 가능하다.
2-4-1 이 경우 개발자가 책임 질 부분은 인증에 필요한 데이터베이스에서 유저정보와 권한정보를 읽어오는 부분이다.
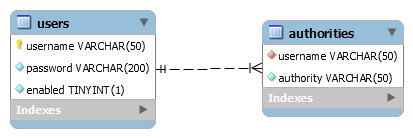
3. 이 포스트에서는 기본적으로 스프링 Security가 지정한 6개의 테이블 중 users와 authorities를 그대로 사용한다.
3-1 기본 users 스키마는 3가지 데이터를 필요로 한다.
3-1-1 username, password, authorties(roles)이다.
3-2 스프링 보안이 지정한 스키마에 따라 아래의 구조의 데이터베이스를 생성한다.
3-1-1 두 개의 테이블 users, authorities테이블은 authorities의 username을 foreign key로 하여 연결되어 있다.
3-1-2 authories 테이블의 authority에 적용할 권한은 'ROLE_' 로 시작해야 한다.
3-1-2-1 프로그램에서 사용할 대는 'ROLE_' 자동적으로 붙여진다.
3-1-3 users 테이블의 password는 앞부분에 password 포멧을 {}을 추가해야 한다.
3-1-3-1 예를 들면 아무런 포멧이 지정되지 않는 경우 {noop}pilseong 이런 식으로 비밀번호가 지정된다.
3. 데이터베이스 설정이 완료되었으니 프로그램 기능을 추가하기 위해 dependency 세팅을 한다.
3-1 이 포스트는 Spring WebMvc, Security, JDBC, MySql을 사용한다.
3-2 바로 직전 포스트의 코드에서 데이터베이스 기능에 대한 것만 추가하는 것이 간편하다.
3-2-1 아래의 pom.xml은 org.apache.maven archetype wepapp 1.4를 사용하여 생성한 프로젝트이다.
<?xml version="1.0" encoding="UTF-8"?>

<project xmlns="http://maven.apache.org/POM/4.0.0"
	xmlns:xsi="http://www.w3.org/2001/XMLSchema-instance"
	xsi:schemaLocation="http://maven.apache.org/POM/4.0.0 http://maven.apache.org/xsd/maven-4.0.0.xsd">
	<modelVersion>4.0.0</modelVersion>

	<groupId>pe.pilseong</groupId>
	<artifactId>spring-security-jdbc</artifactId>
	<version>0.0.1-SNAPSHOT</version>
	<packaging>war</packaging>

	<name>spring-security-jdbc Maven Webapp</name>

	<properties>
		<project.build.sourceEncoding>UTF-8</project.build.sourceEncoding>
		<maven.compiler.source>11</maven.compiler.source>
		<maven.compiler.target>11</maven.compiler.target>
		<springframework.version>5.2.6.RELEASE</springframework.version>
		<springsecurity.version>5.3.2.RELEASE</springsecurity.version>
	</properties>

	<dependencies>
        <!-- 스프링 기본, webmvc -->
		<dependency>
			<groupId>org.springframework</groupId>
			<artifactId>spring-core</artifactId>
			<version>${springframework.version}</version>
		</dependency>
		<dependency>
			<groupId>org.springframework</groupId>
			<artifactId>spring-context</artifactId>
			<version>${springframework.version}</version>
		</dependency>
		<dependency>
			<groupId>org.springframework</groupId>
			<artifactId>spring-webmvc</artifactId>
			<version>${springframework.version}</version>
		</dependency>
		<dependency>
			<groupId>org.springframework.security</groupId>
			<artifactId>spring-security-web</artifactId>
			<version>${springsecurity.version}</version>
		</dependency>

        <!-- 스프링 security -->
		<dependency>
			<groupId>org.springframework.security</groupId>
			<artifactId>spring-security-config</artifactId>
			<version>${springsecurity.version}</version>
		</dependency>
		<dependency>
			<groupId>org.springframework.security</groupId>
			<artifactId>spring-security-taglibs</artifactId>
			<version>${springsecurity.version}</version>
		</dependency>

        <!-- 데이터베이스 사용 -->
		<dependency>
			<groupId>mysql</groupId>
			<artifactId>mysql-connector-java</artifactId>
			<version>8.0.20</version>
		</dependency>
		<dependency>
			<groupId>com.mchange</groupId>
			<artifactId>c3p0</artifactId>
			<version>0.9.5.5</version>
		</dependency>

        <!-- jsp, jstl 기능지원, 서블릿 라이브러리 -->
		<dependency>
			<groupId>javax.servlet</groupId>
			<artifactId>javax.servlet-api</artifactId>
			<version>4.0.1</version>
			<scope>provided</scope>
		</dependency>
		<dependency>
			<groupId>javax.servlet</groupId>
			<artifactId>jstl</artifactId>
			<version>1.2</version>
		</dependency>
		<dependency>
			<groupId>javax.servlet.jsp</groupId>
			<artifactId>javax.servlet.jsp-api</artifactId>
			<version>2.3.3</version>
			<scope>provided</scope>
		</dependency>


		<dependency>
			<groupId>junit</groupId>
			<artifactId>junit</artifactId>
			<version>4.11</version>
			<scope>test</scope>
		</dependency>
	</dependencies>

	<build>
		<finalName>spring-security-jdbc</finalName>
		<pluginManagement><!-- lock down plugins versions to avoid using Maven
				defaults (may be moved to parent pom) -->
			<plugins>
				<plugin>
					<artifactId>maven-clean-plugin</artifactId>
					<version>3.1.0</version>
				</plugin>
				<plugin>
					<artifactId>maven-resources-plugin</artifactId>
					<version>3.0.2</version>
				</plugin>
				<plugin>
					<artifactId>maven-compiler-plugin</artifactId>
					<version>3.8.0</version>
				</plugin>
				<plugin>
					<artifactId>maven-surefire-plugin</artifactId>
					<version>2.22.1</version>
				</plugin>
				<plugin>
					<artifactId>maven-war-plugin</artifactId>
					<version>3.2.2</version>
				</plugin>
				<plugin>
					<artifactId>maven-install-plugin</artifactId>
					<version>2.5.2</version>
				</plugin>
				<plugin>
					<artifactId>maven-deploy-plugin</artifactId>
					<version>2.8.2</version>
				</plugin>
			</plugins>
		</pluginManagement>
	</build>
</project>
4. 데이터베이스의 설정값은 외부의 properties에서 읽어온다.
4-0 외부 persistence-mysql-properties파일은 다음과 같다.
# JDBC connection settings
jdbc.driver=com.mysql.cj.jdbc.Driver
jdbc.url=jdbc:mysql://localhost:3306/spring_security?allowPublicKeyRetrieval=true&useSSL=false&serverTimezone=Asia/Seoul
jdbc.username=springstudent
jdbc.password=springstudent

# Connection Pool properties for c3p0
connection.pool.initialPoolSize=5
connection.pool.minPoolSize=5
connection.pool.maxPoolSize=20
connection.pool.maxIdleTime=3000
4-0-1 jdbc.url을 보면 allowPublicKeyRetrieval=true가 있다. RSA 공개키가 서버로부터 가져오게 할지를 결정한다.
4-0-2 SSL을 사용하지 않아 보안에 취약점을 노출하기 때문에 useSSL=false일 때만 명시를 강제하게 되어 있다.
4-0-2-1 caching_sha2_password authentication plugin이 기본 plugin이 설정된 경우는 사용하면 안된다.
4-0-2-2 이 경우는 그냥 jdbc.url=jdbc:mysql://localhost:3306/spring_security?serverTimezone=Asia/Seoul로 한다.
4-0-3 잘못 설정이 된 경우 이런 에러가 나온다.
java.sql.SQLNonTransientConnectionException: Public Key Retrieval is not allowed
4-1 익숙하지 않으면 아래 포스팅 참고한다.
4-2 이 포스트와 다른 부분이 있다면 Environment 클래스를 사용하여 속성에 접근한다는 정도이다.
4-2-1 Environment 객체는 setProperty, getProperty 메소드를 제공하여 String 타입의 데이터를 읽어올 수 있다.
Spring : Configuration with Java Config Class - 설정 및 properties 에서 읽어오기
1. XML파일 없이 스프링을 설정한다. 2. Configuration 클래스를 생성한다. 2-1 클래스 정의 위에 @Configuration을 붙인다 - xml 설정 파일처럼 이 클래스를 설정파일로 사용한다. 2-2 Annotation을 사용하기 위..
kogle.tistory.com
5. Web MVC 설정하기
5-1 먼저 할 부분은 DispatcherServletInitializer 설정이다.
5-1-1 AbstractAnnotationConfigDispatcherServletInitializer를 상속한 클래스를 작성한다.
package pe.pilseong.spring_security_jdbc.config;

import org.springframework.web.servlet.support.AbstractAnnotationConfigDispatcherServletInitializer;

public class WebDispatchServletInitializer extends AbstractAnnotationConfigDispatcherServletInitializer {

  @Override
  protected Class<?>[] getRootConfigClasses() {
    return null;
  }

  @Override
  protected Class<?>[] getServletConfigClasses() {
    return new Class[] { WebConfig.class };
  }

  @Override
  protected String[] getServletMappings() {
    return new String[] {"/"};
  }
}
5-2 두 번째는 ServleConfigClass로 WebConfig를 작성한다.
5-2-0 아래의 클래스는 외부에서 설정정보를 읽어와 DataSource를 만들고, jsp처리를 위한 ViewResolver를 생성한다.
5-2-1 Web을 위한 Conifg annotation을 설정하고 외부 설정정보를 읽기 위해 @PropertySource도 추가한다.
5-2-2 Environment객체가 @Autowired 되고 있는데 ProperySource로 읽은 placeholder와 연결된다.
5-2-3 데이터베이스는 c3p0를 사용하여 풀링기능을 갖는 ComboPooledDataSource를 생성하여 JDBC로 연결한다.
5-2-4 ViewResolver는 jsp 연결을 위한 view 해석기를 지정한다.
5-2-5 이렇게 하면 데이터베이스와 연결된 Web MVC 설정이 종료된다.
5-3 아래 소스에 두 가지 이 포스트와 관계없는 내용에 대해 적어두고 싶다.
5-3-1 try - catch에서 PropertyVetoException을 받아 RuntimeException을 발생시키고 있는데
5-3-1-1 이것은 관행적이다. uncheck exception으로 전환하여 처리가 용이하도록 한 것이다.
5-3-2 스프링 프레임워크의 기본 Logger는 java.util.logging 패키지에 있다.
5-3-2-1 이것을 가져와서 사용하면 다른 로그와 구별없이 콘솔에서 원하는 내용을 출력할 수 있다.
5-3-2-2 물론 이클립스에서는 색이 전부 붉은 색이라서 그냥 sysout으로 출력하는 게 더 나을 수도 있다.
package pe.pilseong.spring_security_jdbc.config;

import java.beans.PropertyVetoException;
import java.util.logging.Logger;

import javax.sql.DataSource;

import org.springframework.beans.factory.annotation.Autowired;
import org.springframework.context.annotation.Bean;
import org.springframework.context.annotation.ComponentScan;
import org.springframework.context.annotation.Configuration;
import org.springframework.context.annotation.PropertySource;
import org.springframework.core.env.Environment;
import org.springframework.web.servlet.ViewResolver;
import org.springframework.web.servlet.config.annotation.EnableWebMvc;
import org.springframework.web.servlet.view.InternalResourceViewResolver;

import com.mchange.v2.c3p0.ComboPooledDataSource;

@EnableWebMvc
@Configuration
@ComponentScan(basePackages = "pe.pilseong.spring_security_jdbc")
@PropertySource(value = "classpath:persistance-mysql.properties")
public class WebConfig {

  @Autowired
  private Environment env;

  private final Logger logger = Logger.getLogger(getClass().getName());

  @Bean
  public ViewResolver viewResolver() {
    InternalResourceViewResolver viewResolver = new InternalResourceViewResolver();
    viewResolver.setPrefix("WEB-INF/view/");
    viewResolver.setSuffix(".jsp");

    return viewResolver;
  }

  @Bean
  public DataSource dataSource() {
    ComboPooledDataSource dataSource = new ComboPooledDataSource();

    dataSource.setJdbcUrl(env.getProperty("jdbc.url"));
    try {
      dataSource.setDriverClass(env.getProperty("jdbc.driver"));
    } catch (PropertyVetoException e) {
      throw new RuntimeException(e);
    }

    logger.info("jdbc.url :: " + env.getProperty("jdbc.url"));
    logger.info("jdbc.username :: " + env.getProperty("jdbc.username"));
    logger.info("jdbc.password :: " + env.getProperty("jdbc.password"));

    dataSource.setUser(env.getProperty("jdbc.username"));
    dataSource.setPassword(env.getProperty("jdbc.password"));

    dataSource.setInitialPoolSize(getIntProperty("connection.pool.initialPoolSize"));
    dataSource.setMinPoolSize(getIntProperty("connection.pool.minPoolSize"));
    dataSource.setMaxPoolSize(getIntProperty("connection.pool.maxPoolSize"));
    dataSource.setMaxIdleTime(getIntProperty("connection.pool.maxIdleTime"));

    return dataSource;
  }

  private int getIntProperty(String propertyName) {
    return Integer.parseInt(env.getProperty(propertyName));
  }
}
6. Spring Security 설정하기
6-1 Spring Security의 WebApplication context와 servlet container를 초기화하는데 사용할
6-2 AbstractSecurityWebApplicationInitializer를 상속하는 클래스를 작성한다.
package pe.pilseong.spring_security_jdbc.config;

import org.springframework.security.web.context.AbstractSecurityWebApplicationInitializer;

public class WebSecurityInitializer extends AbstractSecurityWebApplicationInitializer {}
6-3 Spring Security 세부설정을 위해 SecurityConfig를 작성한다.
6-3-0 Config 클래스이고 WebSecurity 특성을 활성화 시켜 다양한 Security Filters의 기능을 사용한다.
6-3-1 중요한 부분은 인증관리 객체에 인증방식을 jdbc인증을 지정하고 있는 부분이다.
6-3-2 WebConfig에서 생성한 DataSource를 사용하여 데이터베이스 접근 정보를 제공하고 있다.
6-3-3 이렇게 하면 유저 로그인에 대한 모든 기능은 스프링 Security에서 자동으로 처리해 준다.
package pe.pilseong.spring_security_jdbc.config;

import javax.sql.DataSource;

import org.springframework.beans.factory.annotation.Autowired;
import org.springframework.context.annotation.Configuration;
import org.springframework.security.config.annotation.authentication.builders.AuthenticationManagerBuilder;
import org.springframework.security.config.annotation.web.configuration.EnableWebSecurity;
import org.springframework.security.config.annotation.web.configuration.WebSecurityConfigurerAdapter;

@Configuration
@EnableWebSecurity
public class SeurityConfig extends WebSecurityConfigurerAdapter {

  @Autowired
  private DataSource dataSource;

  @Override
  protected void configure(AuthenticationManagerBuilder auth) throws Exception {
    auth.jdbcAuthentication().dataSource(dataSource);
  }
}
아래의 내용은 이전 포스트의 내용과 동일하다. 이 포스팅은 인증방식을 in-memory에서 jdbc 방식으로 변경한 내용이라 기능상 차이는 없고, 페이지도 수정할 필요가 없다.
7. 남은 건 HttpSecurity로 request처리에 대한 내용을 기술하고 Controller로 페이지 처리를 하는 것이다.
7-1 HttpSecurity에 request 처리를 설정한다. 바로 위 SecurityConfig.java에 들어가는 코드다.
  @Override
  protected void configure(HttpSecurity http) throws Exception {
    http.authorizeRequests()
        .antMatchers("/").permitAll()
        .antMatchers("/employees").hasRole("EMPLOYEE")
        .antMatchers("/leaders/**").hasRole("MANAGER")
        .antMatchers("/systems/**").hasRole("ADMIN")
      .and()
      .formLogin()
        .loginPage("/showLoginPage")
        .loginProcessingUrl("/authenticateUser")
        .permitAll()
      .and()
      .logout()
        .logoutSuccessUrl("/")
        .permitAll()
      .and()
      .exceptionHandling().accessDeniedPage("/access-denied");
  }
7-2 Controller 들 - 지난 포스트와 완전 동일하지만 완결성을 위해 추가한다.
package pe.pilseong.springsecurity.controller;

import org.springframework.stereotype.Controller;
import org.springframework.web.bind.annotation.GetMapping;

@Controller
public class HomeController {

  @GetMapping("/")
  public String landing() {
    return "landing";
  }

  @GetMapping("/employees")
  public String home() {
    return "home";
  }

  @GetMapping("/leaders")
  public String leaders() {
    return "leaders";
  }

  @GetMapping("/systems")
  public String admin() {
    return "systems";
  }
}


package pe.pilseong.spring_security_jdbc.controller;

import org.springframework.stereotype.Controller;
import org.springframework.web.bind.annotation.GetMapping;

@Controller
public class HomeController {

  @GetMapping("/")
  public String landing() {
    return "landing";
  }

  @GetMapping("/employees")
  public String home() {
    return "home";
  }

  @GetMapping("/leaders")
  public String leaders() {
    return "leaders";
  }

  @GetMapping("/systems")
  public String admin() {
    return "systems";
  }
}
7-3 jsp는 변경사항이 없지만 완결성을 위해 추가한다
7-3-1 access-denied.jsp
<%@ page language="java" contentType="text/html; charset=UTF-8"
    pageEncoding="UTF-8"%>
<!DOCTYPE html>
<html>
<head>
<meta charset="UTF-8">
<title>Access denied</title>
</head>
<body>
  <h1>Company Website</h1>
  <hr>
  <p>
    Access Denied - you are not authorized to access this page
  </p>
  <hr>
  <p>
    <a href="${ pageContext.request.contextPath }/">Back to Landing Page</a>
  </p>
</body>
</html>
7-3-2 home.jsp
<%@ taglib prefix="security" uri="http://www.springframework.org/security/tags" %>
<%@ taglib prefix="form" uri="http://www.springframework.org/tags/form"%>
<%@ page language="java" contentType="text/html; charset=UTF-8"
  pageEncoding="UTF-8"%>
<!DOCTYPE html>
<html>
<head>
<meta charset="UTF-8">
<link rel="stylesheet"
  href="https://stackpath.bootstrapcdn.com/bootstrap/4.4.1/css/bootstrap.min.css"
  integrity="sha384-Vkoo8x4CGsO3+Hhxv8T/Q5PaXtkKtu6ug5TOeNV6gBiFeWPGFN9MuhOf23Q9Ifjh"
  crossorigin="anonymous">
<title>Spring Security Custom Login Form</title>
</head>
<body>
  <div class="container">
    <h2>Company Website</h2>
    <hr>
    <p>You are now logged in</p>
    <p>
      User :: <security:authentication property="principal.username"/>
    </p>
    <p>
      Roles(s) :: <security:authentication property="principal.authorities"/>
    </p>
    <security:authorize access="hasRole('MANAGER')">
      <hr>
      <p>
        <a href="${ pageContext.request.contextPath }/leaders">Leadership Meeting(Only for Managers)</a>
      </p>
      <hr>
    </security:authorize>
    <security:authorize access="hasRole('ADMIN')">
      <hr>
      <p>
        <a href="${ pageContext.request.contextPath }/systems">System Meeting(Only for Admins)</a>
      </p>
      <hr>
    </security:authorize>
    <form:form action="${ pageContext.request.contextPath }/logout" method="POST">
      <input type="submit" class="btn btn-primary" value="Logout"/>
    </form:form>
  </div>
</body>
</html>
7-3-3 landing.jsp
<%@ page language="java" contentType="text/html; charset=UTF-8" pageEncoding="UTF-8"%>
<!DOCTYPE html>
<html>
<head>
<meta charset="UTF-8">
<title>Welcome to Company</title>
</head>
<body>
  <p>
    Welcome to Company!!!<br><br>

    <a href="${ pageContext.request.contextPath }/employees">Click to the employee page</a>
  </p>
</body>
</html>
7-3-4 leaders.jsp
<%@ page language="java" contentType="text/html; charset=UTF-8"
    pageEncoding="UTF-8"%>
<!DOCTYPE html>
<html>
<head>
<meta charset="UTF-8">
<title>Insert title here</title>
</head>
<body>
  <h1>Company Website</h1>
  <hr>
  <p>
    This is a page for Managers. We need a long vacation~ go managers!!!
  </p>
  <hr>
  <p>
    <a href="${ pageContext.request.contextPath }/">Back to Landing Page</a>
  </p>
</body>
</html>
7-3-5 plain-login.jsp
<%@ taglib prefix="c" uri="http://java.sun.com/jsp/jstl/core" %>
<%@ taglib prefix="form" uri="http://www.springframework.org/tags/form"%>
<%@ page language="java" contentType="text/html; charset=UTF-8"
  pageEncoding="UTF-8"%>
<!DOCTYPE html>
<html>
<head>
<meta charset="UTF-8">
<link rel="stylesheet"
  href="https://stackpath.bootstrapcdn.com/bootstrap/4.4.1/css/bootstrap.min.css"
  integrity="sha384-Vkoo8x4CGsO3+Hhxv8T/Q5PaXtkKtu6ug5TOeNV6gBiFeWPGFN9MuhOf23Q9Ifjh"
  crossorigin="anonymous">
<title>Spring Security Custom Login Form</title>
</head>
<body>

  <div class="container">
    <div class="card" style="width: 350px; margin-left: auto; margin-right: auto; border: none;">
      <h1 class="display-4">Please Login</h1>
      <form action="${pageContext.request.contextPath}/authenticateUser" method="POST">
        <input type="hidden" name="${ _csrf.parameterName }" value="${ _csrf.token }">
        <div class="form-group">
          <label for="username">Username</label>
          <input type="text" id="username" name="username" class="form-control" />
        </div>
        <div class="form-group">
          <label for="password">Password</label>
          <input type="password" id="password" name="password" class="form-control">
          <c:if test="${ param.error != null }">
            <small id="passwordHelpBlock" class="form-text text-warning">
              Sorry! You entered invalid username/password.
            </small>
          </c:if>
          <c:if test="${ param.logout != null }">
            <small id="passwordHelpBlock" class="form-text text-info">
              You have been logged out.
            </small>
          </c:if>
        </div>
        <input type="submit" value="Login" class="btn btn-primary">
      </form>
    </div>
  </div>

  <script src="https://code.jquery.com/jquery-3.4.1.slim.min.js"
    integrity="sha384-J6qa4849blE2+poT4WnyKhv5vZF5SrPo0iEjwBvKU7imGFAV0wwj1yYfoRSJoZ+n"
    crossorigin="anonymous"></script>
  <script
    src="https://cdn.jsdelivr.net/npm/popper.js@1.16.0/dist/umd/popper.min.js"
    integrity="sha384-Q6E9RHvbIyZFJoft+2mJbHaEWldlvI9IOYy5n3zV9zzTtmI3UksdQRVvoxMfooAo"
    crossorigin="anonymous"></script>
  <script
    src="https://stackpath.bootstrapcdn.com/bootstrap/4.4.1/js/bootstrap.min.js"
    integrity="sha384-wfSDF2E50Y2D1uUdj0O3uMBJnjuUD4Ih7YwaYd1iqfktj0Uod8GCExl3Og8ifwB6"
    crossorigin="anonymous"></script>
</body>
</html>
7-3-6 systems.jsp
<%@ page language="java" contentType="text/html; charset=UTF-8"
    pageEncoding="UTF-8"%>
<!DOCTYPE html>
<html>
<head>
<meta charset="UTF-8">
<title>Insert title here</title>
</head>
<body>
  <h1>Company Website</h1>
  <hr>
  <p>
    This is a page for Admins. Work sucks! Let's make a complaint!!!
  </p>
  <hr>
  <p>
    <a href="${ pageContext.request.contextPath }/">Back to Landing Page</a>
  </p>
</body>
</html>'Spring > Spring Security' 카테고리의 다른 글
| Spring Security : WEB + Security - Basic Authentication Entry point 설정(인증 실패 메시지 변경) (1) | 2020.05.26 |
|---|---|
| Spring Security : Web MVC + Security + JDBC - Password Encyption 사용하기 (0) | 2020.05.18 |
| Spring Security : Web MVC + Security - Role에 따라 내용 보여주기 (0) | 2020.05.17 |
| Spring Security : Web MVC + Security - 접근 거부 Custom 페이지 생성 (0) | 2020.05.17 |
| Spring Security : Web MVC + Security - 페이지 접근 제어 (0) | 2020.05.17 |
- Total
- Today
- Yesterday
- 도커 개발환경 참고
- AWS ARN 구조
- Immuability에 관한 설명
- 자바스크립트 멀티 비동기 함수 호출 참고
- WSDL 참고
- SOAP 컨슈머 참고
- MySql dump 사용법
- AWS Lambda with Addon
- NFC 드라이버 linux 설치
- electron IPC
- mifare classic 강의
- go module 관련 상세한 정보
- C 메모리 찍어보기
- C++ Addon 마이그레이션
- JAX WS Header 관련 stackoverflow
- SOAP Custom Header 설정 참고
- SOAP Custom Header
- SOAP BindingProvider
- dispatcher 사용하여 설정
- vagrant kvm으로 사용하기
- git fork, pull request to the …
- vagrant libvirt bridge network
- python, js의 async, await의 차이
- go JSON struct 생성
- Netflix Kinesis 활용 분석
- docker credential problem
- private subnet에서 outbound IP 확…
- 안드로이드 coroutine
- kotlin with, apply, also 등
- 안드로이드 초기로딩이 안되는 경우
- navigation 데이터 보내기
- 레이스 컨디션 navController
- raylib
- form
- 스프링
- Many-To-Many
- XML
- 하이버네이트
- 외부파일
- hibernate
- 로그인
- jsp
- crud
- login
- 매핑
- one-to-many
- spring boot
- 설정
- Spring Security
- Security
- 설정하기
- mapping
- Rest
- 스프링부트
- RestTemplate
- one-to-one
- 자바
- MYSQL
- WebMvc
- 상속
- Validation
- Angular
- Spring