
티스토리 뷰
1. 스프링 프로파일은 실제 실용환경, 개발환경에 따른 설정을 편리하게 해준다.
2. 아래서 작성할 내용은 유닛 및 통합테스트를 위한 H2와 개발용 MySql, 실구동용 MySql 3가지 프로파일을 작성했다.

3. 프로파일별로 default, prod, dev로 나누어서 작성하였다.
3-1 리소스 폴더에는 기본적으로 모든 경우에 동작하는 application.properties 파일을 그대로 사용하였다.
3-1-1 내용은 디버깅으로 동작하도록 하였고 기본동작 포트는 8080이다.
logging.level.pe.pilseong.recipe=debug

spring.thymeleaf.cache=false
spring.thymeleaf.mode=HTML

server.port=8080
3-2 default 프로파일은 아무 프로파일이 선택되지 않은 경우에 실행한다.
3-2-1 application-default.yml 이름으로 작성하였다.
3-2-2 내용은 포트는 8081번을 사용하고 데이터베이스를 H2로 지정하고 경로를 testdb로 지정하였다.
3-2-2-1 최신 버전의 스프링에서는 H2 데이터베이스 이름을 렌덤으로 지정하도록 바뀌어서 지정하는 게 편하다.
3-2-3 테스트 용이기 때문에 hibernate에서 sql을 보여주도록 하였다.
3-2-4 아래 막아 놓은 부분은 처음에 할 때는 제대로 동작을 안해서 붙였는데 나중에 보니 잘 동작해서 다시 막았다.
3-2-5 h2는 initialization-mode가 always이기 때문에 별도의 설정이 필요없다. 자동으로 data.sql을 사용한다.
3-2-5-1 사실 platform을 h2로 지정했기 때문에 data-h2.sql이라는 이름을 붙여도 된다.
3-2-5-2 하지만, dev에서 mysql과 공유하기 때문에 그냥 data.sql로 남겨 두었다.
3-2-5-3 만약 고유의 데이터가 필요하면 각 프로파일 데이터 파일을 작성해야 한다.
server:
  port: 8081

spring:
  datasource:
    url: jdbc:h2:mem:testdb
    platform: h2

  jpa:
    show-sql: true

  # jpa:
  #   database-platform: org.hibernate.dialect.H2Dialect
  #   hibernate:
  #     ddl-auto: create-drop
3-3 dev 프로파일은 일반적으로 개발할 때 사용한다.
3-3-1 application-dev.yml로 이름을 지정하였다.
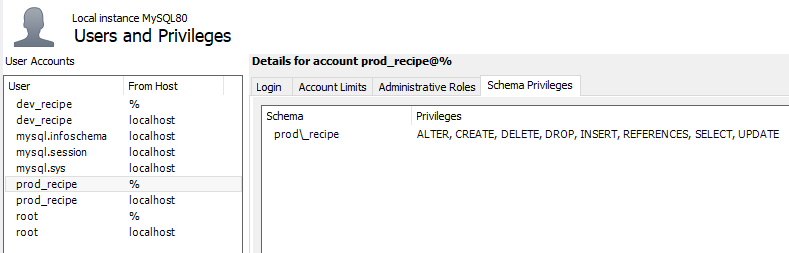
3-3-2 작업용 데이터베이스와 작업용 유저를 작성하여 먼저 생성하였다. workbench에서 UI로 작업하면 편리하다.
3-3-3 외부 데이터베이스는 initialization-mode가 기본값으로 never로 되어있기 때문에 data.sql을 사용하려면
3-3-3-1 always로 값을 변경해주어야 한다.
3-3-3-2 data-mysql.sql로 이름을 지정해도 되지만, 내용이 위의 H2의 것과 같기 때문에 기본이름으로 사용한다.
3-3-4 ddl-auto는 스키마를 항상 실행할 때 마다 실행하도록 하고 있다.
3-3-5 개발용이므로 hibernate가 sql을 보여주도록 설정하였다.
spring:
  datasource:
    url: jdbc:mysql://localhost:3306/dev_recipe?serverTimezone=Asia/Seoul
    username: dev_recipe
    password: dev_recipe
    initialization-mode: always
  jpa:
    hibernate:
      ddl-auto: create
    database-platform: org.hibernate.dialect.MySQL8Dialect
    database: mysql
    show-sql: true

    # properties:
    #   javax:
    #     persistence:
    #       schema-generation:
    #         create-source: metadata
    #         scripts:
    #           action: create
    #           create-target: recipe_create.sql
3-4 위의 두 프로파일은 구동 시 기본데이터가 필요하므로 데이터를 삽입하는 코드를 로직에 삽입하였다.
3-4-1 사실 그냥 data.sql에 넣어도 된다. 이런 방법도 있다는 것을 그냥 보여주기 위한 것이다.
3-4-2 @Profile을 보면 default와 dev일 경우에만 실행하도록 작성하였다.
package pe.pilseong.recipe.bootstrap;

import java.math.BigDecimal;
import java.util.ArrayList;
import java.util.List;
import java.util.Optional;

import javax.transaction.Transactional;

import org.springframework.context.ApplicationListener;
import org.springframework.context.annotation.Profile;
import org.springframework.context.event.ContextRefreshedEvent;
import org.springframework.stereotype.Component;

import lombok.RequiredArgsConstructor;
import lombok.extern.slf4j.Slf4j;
import pe.pilseong.recipe.domain.Category;
import pe.pilseong.recipe.domain.Difficulty;
import pe.pilseong.recipe.domain.Ingredient;
import pe.pilseong.recipe.domain.Note;
import pe.pilseong.recipe.domain.Recipe;
import pe.pilseong.recipe.domain.UnitOfMeasure;
import pe.pilseong.recipe.repository.CategoryRepository;
import pe.pilseong.recipe.repository.RecipeRepository;
import pe.pilseong.recipe.repository.UnitOfMeasureRepository;

@Slf4j
@Component
@RequiredArgsConstructor
@Profile({"default", "dev"})
public class RecipeBootstrap  implements ApplicationListener<ContextRefreshedEvent> {
  private final CategoryRepository categoryRepository;
  private final RecipeRepository recipeRepository;
  private final UnitOfMeasureRepository unitOfMeasureRepository;

  @Override
  @Transactional
  public void onApplicationEvent(ContextRefreshedEvent event) {
    log.debug("onApplicationEvent in RecipeBootstrap");
    recipeRepository.saveAll(getRecipes());
  }

  private List<Recipe> getRecipes() {

    List<Recipe> recipes = new ArrayList<>(2);

    // get UOMs
    Optional<UnitOfMeasure> eachUomOptional = unitOfMeasureRepository.findByDescription("Each");

    if (!eachUomOptional.isPresent()) {
      throw new RuntimeException("Expected UOM Not Found");
    }

    Optional<UnitOfMeasure> tableSpoonUomOptional = unitOfMeasureRepository.findByDescription("Tablespoon");

    if (!tableSpoonUomOptional.isPresent()) {
      throw new RuntimeException("Expected UOM Not Found");
    }

    Optional<UnitOfMeasure> teaSpoonUomOptional = unitOfMeasureRepository.findByDescription("Teaspoon");

    if (!teaSpoonUomOptional.isPresent()) {
      throw new RuntimeException("Expected UOM Not Found");
    }

    Optional<UnitOfMeasure> dashUomOptional = unitOfMeasureRepository.findByDescription("Dash");

    if (!dashUomOptional.isPresent()) {
      throw new RuntimeException("Expected UOM Not Found");
    }

    Optional<UnitOfMeasure> pintUomOptional = unitOfMeasureRepository.findByDescription("Pint");

    if (!pintUomOptional.isPresent()) {
      throw new RuntimeException("Expected UOM Not Found");
    }

    Optional<UnitOfMeasure> cupsUomOptional = unitOfMeasureRepository.findByDescription("Cup");

    if (!cupsUomOptional.isPresent()) {
      throw new RuntimeException("Expected UOM Not Found");
    }

    // get optionals
    UnitOfMeasure eachUom = eachUomOptional.get();
    UnitOfMeasure tableSpoonUom = tableSpoonUomOptional.get();
    UnitOfMeasure teapoonUom = tableSpoonUomOptional.get();
    UnitOfMeasure dashUom = dashUomOptional.get();
    UnitOfMeasure pintUom = pintUomOptional.get();
    UnitOfMeasure cupsUom = cupsUomOptional.get();

    // get Categories
    Optional<Category> americanCategoryOptional = categoryRepository.findByDescription("American");

      if(!americanCategoryOptional.isPresent()){
          throw new RuntimeException("Expected Category Not Found");
      }

      Optional<Category> mexicanCategoryOptional = categoryRepository.findByDescription("Mexican");

      if(!mexicanCategoryOptional.isPresent()){
          throw new RuntimeException("Expected Category Not Found");
      }

      Category americanCategory = americanCategoryOptional.get();
      Category mexicanCategory = mexicanCategoryOptional.get();

      //Yummy Guac
      Recipe guacRecipe = new Recipe();
      guacRecipe.setDescription("Perfect Guacamole");
      guacRecipe.setPrepTime(10);
      guacRecipe.setCookTime(0);
      guacRecipe.setDifficulty(Difficulty.EASY);
      guacRecipe.setDirections("1 Cut avocado, remove flesh: Cut the avocados in half. Remove seed. Score the inside of the avocado with a blunt knife and scoop out the flesh with a spoon" +
              "\n" +
              "2 Mash with a fork: Using a fork, roughly mash the avocado. (Don't overdo it! The guacamole should be a little chunky.)" +
              "\n" +
              "3 Add salt, lime juice, and the rest: Sprinkle with salt and lime (or lemon) juice. The acid in the lime juice will provide some balance to the richness of the avocado and will help delay the avocados from turning brown.\n" +
              "Add the chopped onion, cilantro, black pepper, and chiles. Chili peppers vary individually in their hotness. So, start with a half of one chili pepper and add to the guacamole to your desired degree of hotness.\n" +
              "Remember that much of this is done to taste because of the variability in the fresh ingredients. Start with this recipe and adjust to your taste.\n" +
              "4 Cover with plastic and chill to store: Place plastic wrap on the surface of the guacamole cover it and to prevent air reaching it. (The oxygen in the air causes oxidation which will turn the guacamole brown.) Refrigerate until ready to serve.\n" +
              "Chilling tomatoes hurts their flavor, so if you want to add chopped tomato to your guacamole, add it just before serving.\n" +
              "\n" +
              "\n" +
              "Read more: http://www.simplyrecipes.com/recipes/perfect_guacamole/#ixzz4jvpiV9Sd");

      Note guacNotes = new Note();
      guacNotes.setRecipeNote("For a very quick guacamole just take a 1/4 cup of salsa and mix it in with your mashed avocados.\n" +
              "Feel free to experiment! One classic Mexican guacamole has pomegranate seeds and chunks of peaches in it (a Diana Kennedy favorite). Try guacamole with added pineapple, mango, or strawberries.\n" +
              "The simplest version of guacamole is just mashed avocados with salt. Don't let the lack of availability of other ingredients stop you from making guacamole.\n" +
              "To extend a limited supply of avocados, add either sour cream or cottage cheese to your guacamole dip. Purists may be horrified, but so what? It tastes great.\n" +
              "\n" +
              "\n" +
              "Read more: http://www.simplyrecipes.com/recipes/perfect_guacamole/#ixzz4jvoun5ws");
      guacRecipe.setNote(guacNotes);

      guacRecipe.addIngredient(new Ingredient("ripe avocados", new BigDecimal(2), eachUom));
      guacRecipe.addIngredient(new Ingredient("Kosher salt", new BigDecimal(".5"), teapoonUom));
      guacRecipe.addIngredient(new Ingredient("fresh lime juice or lemon juice", new BigDecimal(2), tableSpoonUom));
      guacRecipe.addIngredient(new Ingredient("minced red onion or thinly sliced green onion", new BigDecimal(2), tableSpoonUom));
      guacRecipe.addIngredient(new Ingredient("serrano chiles, stems and seeds removed, minced", new BigDecimal(2), eachUom));
      guacRecipe.addIngredient(new Ingredient("Cilantro", new BigDecimal(2), tableSpoonUom));
      guacRecipe.addIngredient(new Ingredient("freshly grated black pepper", new BigDecimal(2), dashUom));
      guacRecipe.addIngredient(new Ingredient("ripe tomato, seeds and pulp removed, chopped", new BigDecimal(".5"), eachUom));

      guacRecipe.getCategories().add(americanCategory);
      guacRecipe.getCategories().add(mexicanCategory);

      americanCategory.getRecipes().add(guacRecipe);
      mexicanCategory.getRecipes().add(guacRecipe);

      guacRecipe.setUrl("http://www.simplerecipes.com/recipes/perfect_guacamole/");
      guacRecipe.setServings(4);
      guacRecipe.setSource("Simply Recipes");

      //add to return list
      recipes.add(guacRecipe);

      //Yummy Tacos
      Recipe tacosRecipe = new Recipe();
      tacosRecipe.setDescription("Spicy Grilled Chicken Taco");
      tacosRecipe.setCookTime(9);
      tacosRecipe.setPrepTime(20);
      tacosRecipe.setDifficulty(Difficulty.MODERATE);

      tacosRecipe.setDirections("1 Prepare a gas or charcoal grill for medium-high, direct heat.\n" +
              "2 Make the marinade and coat the chicken: In a large bowl, stir together the chili powder, oregano, cumin, sugar, salt, garlic and orange zest. Stir in the orange juice and olive oil to make a loose paste. Add the chicken to the bowl and toss to coat all over.\n" +
              "Set aside to marinate while the grill heats and you prepare the rest of the toppings.\n" +
              "\n" +
              "\n" +
              "3 Grill the chicken: Grill the chicken for 3 to 4 minutes per side, or until a thermometer inserted into the thickest part of the meat registers 165F. Transfer to a plate and rest for 5 minutes.\n" +
              "4 Warm the tortillas: Place each tortilla on the grill or on a hot, dry skillet over medium-high heat. As soon as you see pockets of the air start to puff up in the tortilla, turn it with tongs and heat for a few seconds on the other side.\n" +
              "Wrap warmed tortillas in a tea towel to keep them warm until serving.\n" +
              "5 Assemble the tacos: Slice the chicken into strips. On each tortilla, place a small handful of arugula. Top with chicken slices, sliced avocado, radishes, tomatoes, and onion slices. Drizzle with the thinned sour cream. Serve with lime wedges.\n" +
              "\n" +
              "\n" +
              "Read more: http://www.simplyrecipes.com/recipes/spicy_grilled_chicken_tacos/#ixzz4jvtrAnNm");

      Note tacoNotes = new Note();
      tacoNotes.setRecipeNote("We have a family motto and it is this: Everything goes better in a tortilla.\n" +
              "Any and every kind of leftover can go inside a warm tortilla, usually with a healthy dose of pickled jalapenos. I can always sniff out a late-night snacker when the aroma of tortillas heating in a hot pan on the stove comes wafting through the house.\n" +
              "Today’s tacos are more purposeful – a deliberate meal instead of a secretive midnight snack!\n" +
              "First, I marinate the chicken briefly in a spicy paste of ancho chile powder, oregano, cumin, and sweet orange juice while the grill is heating. You can also use this time to prepare the taco toppings.\n" +
              "Grill the chicken, then let it rest while you warm the tortillas. Now you are ready to assemble the tacos and dig in. The whole meal comes together in about 30 minutes!\n" +
              "\n" +
              "\n" +
              "Read more: http://www.simplyrecipes.com/recipes/spicy_grilled_chicken_tacos/#ixzz4jvu7Q0MJ");
      tacosRecipe.setNote(tacoNotes);


      tacosRecipe.addIngredient(new Ingredient("Ancho Chili Powder", new BigDecimal(2), tableSpoonUom));
      tacosRecipe.addIngredient(new Ingredient("Dried Oregano", new BigDecimal(1), teapoonUom));
      tacosRecipe.addIngredient(new Ingredient("Dried Cumin", new BigDecimal(1), teapoonUom));
      tacosRecipe.addIngredient(new Ingredient("Sugar", new BigDecimal(1), teapoonUom));
      tacosRecipe.addIngredient(new Ingredient("Salt", new BigDecimal(".5"), teapoonUom));
      tacosRecipe.addIngredient(new Ingredient("Clove of Garlic, Choppedr", new BigDecimal(1), eachUom));
      tacosRecipe.addIngredient(new Ingredient("finely grated orange zestr", new BigDecimal(1), tableSpoonUom));
      tacosRecipe.addIngredient(new Ingredient("fresh-squeezed orange juice", new BigDecimal(3), tableSpoonUom));
      tacosRecipe.addIngredient(new Ingredient("Olive Oil", new BigDecimal(2), tableSpoonUom));
      tacosRecipe.addIngredient(new Ingredient("boneless chicken thighs", new BigDecimal(4), tableSpoonUom));
      tacosRecipe.addIngredient(new Ingredient("small corn tortillasr", new BigDecimal(8), eachUom));
      tacosRecipe.addIngredient(new Ingredient("packed baby arugula", new BigDecimal(3), cupsUom));
      tacosRecipe.addIngredient(new Ingredient("medium ripe avocados, slic", new BigDecimal(2), eachUom));
      tacosRecipe.addIngredient(new Ingredient("radishes, thinly sliced", new BigDecimal(4), eachUom));
      tacosRecipe.addIngredient(new Ingredient("cherry tomatoes, halved", new BigDecimal(".5"), pintUom));
      tacosRecipe.addIngredient(new Ingredient("red onion, thinly sliced", new BigDecimal(".25"), eachUom));
      tacosRecipe.addIngredient(new Ingredient("Roughly chopped cilantro", new BigDecimal(4), eachUom));
      tacosRecipe.addIngredient(new Ingredient("cup sour cream thinned with 1/4 cup milk", new BigDecimal(4), cupsUom));
      tacosRecipe.addIngredient(new Ingredient("lime, cut into wedges", new BigDecimal(4), eachUom));

      tacosRecipe.getCategories().add(americanCategory);
      tacosRecipe.getCategories().add(mexicanCategory);

      americanCategory.getRecipes().add(tacosRecipe);
      mexicanCategory.getRecipes().add(tacosRecipe);

      recipes.add(tacosRecipe);
      return recipes;
  }
}
3-5 마지막으로 실용환경을 위한 profile이다.
3-5-1 파일이름은 application-prod.yml이고 별차이가 없다.
3-5-2 포트를 별도로 지정하고 있고, 로깅레벨은 에러만 표시하도록 하고 있다.
3-5-3 ddl-auto는 스키마 검증용으로 지정되어 구동 시 domain과 DB 스키마가 호환되는지를 확인해 준다.
3-5-3-1 즉, 이 말은 별도로 데이터베이스를 모두 작업해 두어야 한다는 의미이다.
3-5-3-2 귀찮으면 create으로 생성하고 난 후에 validate으로 돌려 두면 편리하다.
3-5-4 실 서버용이므로 sql은 보여주지 않는다.
server:
  port: 8081

logging:
  level:
    pe.pilseong.recipe: error

spring:
  datasource:
    url: jdbc:mysql://localhost:3306/prod_recipe?serverTimezone=Asia/Seoul
    username: prod_recipe
    password: prod_recipe
  jpa:
    hibernate:
      ddl-auto: validate
    database-platform: org.hibernate.dialect.MySQL8Dialect
    database: mysql
    show-sql: false
3-5-5 실행하면 DB에는 아무 것도 없지만 기본 데이터가 필요한 존재해야 하는 경우 별도의 클래스를 만든다.
3-5-5-1 아래의 경우는 데이터베이스 내에 category와 unitOfMeasure가 없는 경우 초기 데이터를 로딩한다.
package pe.pilseong.recipe.bootstrap;

import org.springframework.context.ApplicationListener;
import org.springframework.context.annotation.Profile;
import org.springframework.context.event.ContextRefreshedEvent;
import org.springframework.stereotype.Component;

import lombok.RequiredArgsConstructor;
import lombok.extern.slf4j.Slf4j;
import pe.pilseong.recipe.domain.Category;
import pe.pilseong.recipe.domain.UnitOfMeasure;
import pe.pilseong.recipe.repository.CategoryRepository;
import pe.pilseong.recipe.repository.UnitOfMeasureRepository;

@Slf4j
@Component
@RequiredArgsConstructor
@Profile("prod")
public class RecipeMySQLBoostrap implements ApplicationListener<ContextRefreshedEvent> {
    private final CategoryRepository categoryRepository;
    private final UnitOfMeasureRepository unitOfMeasureRepository;

    @Override
    public void onApplicationEvent(ContextRefreshedEvent contextRefreshedEvent) {

        if (categoryRepository.count() == 0L){
            log.debug("Loading Categories");
            loadCategories();
        }

        if (unitOfMeasureRepository.count() == 0L){
            log.debug("Loading UOMs");
            loadUom();
        }
    }

    private void loadCategories(){
        Category cat1 = new Category();
        cat1.setDescription("American");
        categoryRepository.save(cat1);

        Category cat2 = new Category();
        cat2.setDescription("Italian");
        categoryRepository.save(cat2);

        Category cat3 = new Category();
        cat3.setDescription("Mexican");
        categoryRepository.save(cat3);

        Category cat4 = new Category();
        cat4.setDescription("Fast Food");
        categoryRepository.save(cat4);
    }

    private void loadUom(){
        UnitOfMeasure uom1 = new UnitOfMeasure();
        uom1.setDescription("Teaspoon");
        unitOfMeasureRepository.save(uom1);

        UnitOfMeasure uom2 = new UnitOfMeasure();
        uom2.setDescription("Tablespoon");
        unitOfMeasureRepository.save(uom2);

        UnitOfMeasure uom3 = new UnitOfMeasure();
        uom3.setDescription("Cup");
        unitOfMeasureRepository.save(uom3);

        UnitOfMeasure uom4 = new UnitOfMeasure();
        uom4.setDescription("Pinch");
        unitOfMeasureRepository.save(uom4);

        UnitOfMeasure uom5 = new UnitOfMeasure();
        uom5.setDescription("Ounce");
        unitOfMeasureRepository.save(uom5);

        UnitOfMeasure uom6 = new UnitOfMeasure();
        uom6.setDescription("Each");
        unitOfMeasureRepository.save(uom6);

        UnitOfMeasure uom7 = new UnitOfMeasure();
        uom7.setDescription("Pint");
        unitOfMeasureRepository.save(uom7);

        UnitOfMeasure uom8 = new UnitOfMeasure();
        uom8.setDescription("Dash");
        unitOfMeasureRepository.save(uom8);
    }
}
4. 보통 vscode로 작업하기 때문에 프로파일 실행이 조금 번거롭다.
4-1 스프링부트2 부터는 아래처럼 하여 maven으로 실행하면 된다.
$ mvn spring-boot:run -Dspring-boot.run.profiles=prod
'Spring > Spring Basic' 카테고리의 다른 글
| 설정 : Java + Spring + Console + JDBC + Gradle 테스트 용 설정 2 (0) | 2021.11.28 |
|---|---|
| 설정 : Java + Spring + Console + JDBC + Gradle 테스트 용 설정 1 (0) | 2021.11.28 |
| Spring Basic : Spring MVC Internationalization i18n 설정 (0) | 2020.08.09 |
| Spring Basic : Spring MVC Formatter 사용하기 (0) | 2020.08.07 |
| Spring Basic : 외부 설정 파일에서 읽어오기 (정리) (0) | 2020.07.24 |
- Total
- Today
- Yesterday
- 도커 개발환경 참고
- AWS ARN 구조
- Immuability에 관한 설명
- 자바스크립트 멀티 비동기 함수 호출 참고
- WSDL 참고
- SOAP 컨슈머 참고
- MySql dump 사용법
- AWS Lambda with Addon
- NFC 드라이버 linux 설치
- electron IPC
- mifare classic 강의
- go module 관련 상세한 정보
- C 메모리 찍어보기
- C++ Addon 마이그레이션
- JAX WS Header 관련 stackoverflow
- SOAP Custom Header 설정 참고
- SOAP Custom Header
- SOAP BindingProvider
- dispatcher 사용하여 설정
- vagrant kvm으로 사용하기
- git fork, pull request to the …
- vagrant libvirt bridge network
- python, js의 async, await의 차이
- go JSON struct 생성
- Netflix Kinesis 활용 분석
- docker credential problem
- private subnet에서 outbound IP 확…
- 안드로이드 coroutine
- kotlin with, apply, also 등
- 안드로이드 초기로딩이 안되는 경우
- navigation 데이터 보내기
- 레이스 컨디션 navController
- raylib
- 외부파일
- 자바
- Spring
- Spring Security
- 설정
- 하이버네이트
- hibernate
- 설정하기
- one-to-one
- 스프링부트
- 상속
- 스프링
- crud
- MYSQL
- XML
- Rest
- Many-To-Many
- jsp
- Validation
- login
- 로그인
- 매핑
- one-to-many
- form
- Security
- WebMvc
- mapping
- Angular
- spring boot
- RestTemplate