
티스토리 뷰
설정 : Java + Spring + Console + JDBC + Gradle 테스트 용 설정 1
Korean Eagle 2021. 11. 28. 22:210-1. 이거 적는 이유는 오라클 데이터베이스에서 돌리면 3초 짜리 쿼리가 MyBatis에서는 20초나 걸려 JDBC로 직접 호출하는 코드를 만들려고 하는데 기본 프로젝트 설정을 하려는데 도무지 생각이 나지 않아서 천천히 다시 생각을 떠올리며 작성한다.
0-2. 최근에 x64 Assembly와 Linux Kernal 모듈 개발에 집중하고 있다보니 이런 것들이 또 기억이 나지 않는다.
0-3. 어차피 나중에 머리에 남는 것은 기본적인 흐름이다. 그래서 기억할 것만 적어 본다.
0-4. 기본적인 코드는 토비의 스프링의 것을 가져왔다. 구조는 물론 다르다.
1. Gradle Java 프로젝트 생성
1-1 이건 기본적인 내용이라서 적을 것이 별로 없다. gradle 7.3부터 Java 17을 지원한다.
1-2 우분투 20.04에서 gradle을 설치할 때 현재 snap이 가져오는 최신버전이 7.2이라서 Java 11을 사용하였다.
1-3 빈 폴더 하나 만들고 아래 처럼 gradle init으로 프로젝트를 생성한다. 타입은 application으로 해야 plugin이나 dependency 를 추가하기 용의한 build.gradle이 만들어 진다.
1-4 DSL로 groovy를 선택하였다. Kotlin이 능숙하지만 JetBrains을 아주 싫어해서 gradle에서는 groovy를 선호한다.
1-5 테스트 용이니 단독 프로젝트를 생성하였다. 테스트는 JUnit5 Jupiter를 사용했다. 문법이나 정책이 JUnit4와 좀 다르다.

2. MYSQL 설치, 데이터베이스 생성 및 유저 등록
2-1 이거 작성한다고 mysql을 지웠다가 아래 처럼 다시 설치하였다. apt로 검색해서 installed로 표기된, 즉 automatic이 같이 붙어 있는 dependency로 설치된 게 아닌 것을 찾아 삭제하면 된다. snap은 snap list로 검색하면 된다. 우분투에서는 apt와 snap을 같이 사용하기 때문에 한번씩 어느 툴로 설치했는지 햇갈릴 때가 있다.

2-2 서버의 상태를 확인하고 서비스가 없으면 재기동한다.
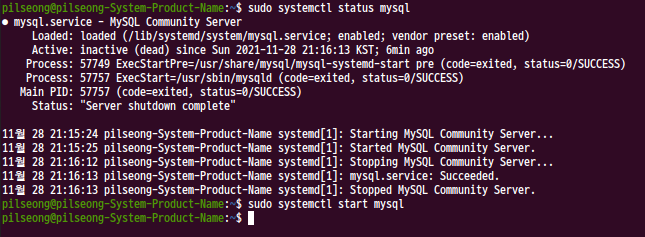
2-3 이렇게 설치를 하면 mysql에는 root 계정이 등록된다. 리눅스에서는 문제가 이 root 계정은 sudo로만 접근이 가능하다.
2-3-1 다시 말하면, DB client를 설치하면 root로는 접속이 안된다.
2-3-2 그래서 바람직하지 않지만 테스트를 위해서는 슈퍼 유저하나 만드는 게 속편하다.
2-3-3 아래를 보면 그냥 접근하니 권한이 없다는 메시지가 나온다. sudo로 해서 접속하면 된다.
2-3-4 리눅스 버전의 mysql은 root 비번은 없다. 그냥 엔터치면 된다.

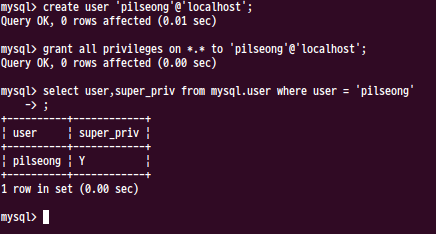
2-4 이 상황에서 DBEAVER 같은 걸로 접속하면 당연히 붙지 않기 때문에 콘솔에서 유저를 만들고 권한을 주어야 한다.
2-4-1 슈퍼 유저 만드는 건 다양한 방법이 있는데 나는 귀찮아서 그냥 유저 생성하고 권한지정하는 방법으로 한다.
2-4-2 루트가 비밀번호가 없는데 서브계정에 무슨 비밀번호가 필요할까. 그냥 비밀번호는 없다. 그리고 권한은 다 준다.
2-5 이제 데이터베이스 생성한다. 토비 책에 나오는 DB 이름인 springbook, testdb를 그대로 사용한다.
2-5-1 이젠 서브 계정으로 sudo없이도 클라이언트 접속이 가능하다. 나는 DBeaver를 사용한다.
2-5-2 DB 생성은 아주 간단하다. 아래 쿼리로 database 두 개 만들고 각각 users 테이블을 만든다.
CREATE database springbook;
CREATE database testdb;

CREATE TABLE `users` (
  `id` varchar(10) NOT NULL,
  `name` varchar(20) NOT NULL,
  `password` varchar(10) NOT NULL,
  PRIMARY KEY (`id`)
)
3. 프로젝트 기본 설정하기
3-1 gradle에 dependency를 설정하는 부분이다. 아래는 프로젝트 생성하면 나오는 기본 build.gradle이다.
/*
 * This file was generated by the Gradle 'init' task.
 *
 * This generated file contains a sample Java application project to get you started.
 * For more details take a look at the 'Building Java & JVM projects' chapter in the Gradle
 * User Manual available at https://docs.gradle.org/7.2/userguide/building_java_projects.html
 */

plugins {
    // Apply the application plugin to add support for building a CLI application in Java.
    id 'application'
}

repositories {
    // Use Maven Central for resolving dependencies.
    mavenCentral()
}

dependencies {
    // Use JUnit Jupiter for testing.
    testImplementation 'org.junit.jupiter:junit-jupiter:5.7.2'

    // This dependency is used by the application.
    implementation 'com.google.guava:guava:30.1.1-jre'
}

application {
    // Define the main class for the application.
    mainClass = 'basic_project.App'
}

tasks.named('test') {
    // Use JUnit Platform for unit tests.
    useJUnitPlatform()
}
3-2 아래처럼 몇 가지 설정한다.
3-1 lombok의 경우는 2가지 방법이 있는데 의존성에 annotationProcessor를 추가하여 컴파일전에 annotation을 해석하거나
3-2 아래처럼 plugin을 추가하는 방법이다. lombok은 annotation의 해석 시점이 중요하기 때문에 주의해야 한다.
3-3 plugin에 보면 com.addrshr.test-logger라는 게 추가되어 있다. gradle test는 실행 시 정보를 하나도 보여 주지 않는다.
3-3-1 각 테스트에 대해서 성공 실패 정도라도 알고 싶으면 plugin을 설치하는 게 좋다. 아래는 많이 쓰는 거 하나 붙였다.
3-4 hamcrest는 JUnit4에서는 별도로 추가 할 필요가 없었지만
3-4-1 Jupiter에서는 assertThat 정책이 별도의 패키지로 위임되어 별도의 패키지를 명시하여 추가해야 한다.
3-5 org.springframework:spring-test는 테스트자동화를 위한 SpringExtension, ContextConfiguration 클래스 등을 포함한다.
3-6 mysql driver도 추가하였다.
3-7 implementation은 컴파일 시 jar, war 패키징에 모두 포함된다. testImplementation은 테스트에만 사용된다.
3-7-1 나중에 gradle도 한 번 정리해야 할 것 같다. 자바를 거의 안쓰다 보니 이젠 가물가물하다.
/*
 * This file was generated by the Gradle 'init' task.
 *
 * This generated file contains a sample Java application project to get you started.
 * For more details take a look at the 'Building Java & JVM projects' chapter in the Gradle
 * User Manual available at https://docs.gradle.org/7.2/userguide/building_java_projects.html
 */
plugins {
    // Apply the application plugin to add support for building a CLI application in Java.
    id 'application'
    id "io.freefair.lombok" version "6.3.0"
    id "com.adarshr.test-logger" version "3.1.0"
}

repositories {
    // Use Maven Central for resolving dependencies.
    mavenCentral()
}

dependencies {
    // Use JUnit Jupiter for testing.
    testImplementation 'org.junit.jupiter:junit-jupiter:5.7.2'

    // SpringExtension.class, ContextConfiguration.class
    testImplementation 'org.springframework:spring-test:5.3.13'

    // https://mvnrepository.com/artifact/org.hamcrest/hamcrest-library
    testImplementation 'org.hamcrest:hamcrest-library:2.2'

    // This dependency is used by the application.
    implementation 'com.google.guava:guava:30.1.1-jre'

    // https://mvnrepository.com/artifact/mysql/mysql-connector-java
    implementation 'mysql:mysql-connector-java:8.0.27'

    // https://mvnrepository.com/artifact/org.springframework/spring-context
    implementation 'org.springframework:spring-context:5.3.13'

    // https://mvnrepository.com/artifact/org.springframework/spring-jdbc
    implementation 'org.springframework:spring-jdbc:5.3.13'
}

application {
    // Define the main class for the application.
    mainClass = 'springstudy.App'
}

tasks.named('test') {
    // Use JUnit Platform for unit tests.
    useJUnitPlatform()
}'Spring > Spring Basic' 카테고리의 다른 글
| Spring Basic : 스프링 학습 1 (0) | 2021.12.06 |
|---|---|
| 설정 : Java + Spring + Console + JDBC + Gradle 테스트 용 설정 2 (0) | 2021.11.28 |
| Spring Basic : profile 사용하기 - 2 (0) | 2020.08.19 |
| Spring Basic : Spring MVC Internationalization i18n 설정 (0) | 2020.08.09 |
| Spring Basic : Spring MVC Formatter 사용하기 (0) | 2020.08.07 |
- Total
- Today
- Yesterday
- 도커 개발환경 참고
- AWS ARN 구조
- Immuability에 관한 설명
- 자바스크립트 멀티 비동기 함수 호출 참고
- WSDL 참고
- SOAP 컨슈머 참고
- MySql dump 사용법
- AWS Lambda with Addon
- NFC 드라이버 linux 설치
- electron IPC
- mifare classic 강의
- go module 관련 상세한 정보
- C 메모리 찍어보기
- C++ Addon 마이그레이션
- JAX WS Header 관련 stackoverflow
- SOAP Custom Header 설정 참고
- SOAP Custom Header
- SOAP BindingProvider
- dispatcher 사용하여 설정
- vagrant kvm으로 사용하기
- git fork, pull request to the …
- vagrant libvirt bridge network
- python, js의 async, await의 차이
- go JSON struct 생성
- Netflix Kinesis 활용 분석
- docker credential problem
- private subnet에서 outbound IP 확…
- 안드로이드 coroutine
- kotlin with, apply, also 등
- 안드로이드 초기로딩이 안되는 경우
- navigation 데이터 보내기
- 레이스 컨디션 navController
- raylib
- 설정하기
- 설정
- 외부파일
- crud
- jsp
- one-to-many
- Validation
- form
- mapping
- Security
- 스프링부트
- Rest
- 상속
- RestTemplate
- Spring
- login
- Many-To-Many
- WebMvc
- 로그인
- 하이버네이트
- spring boot
- Spring Security
- 매핑
- XML
- hibernate
- 자바
- 스프링
- MYSQL
- Angular
- one-to-one