티스토리 뷰
1. 지금까지 live-server를 사용하여 react를 기동하였다.
1-1 webpack은 개발용으로 사용할 수 있는 다양한 기능을 가진 서버를 지원하고 있다.
1-2 이 서버를 사용하면 내부적으로 babel을 연결하여 컴파일하고 메모리를 활용하여 빠르게 재기동도 가능하다.
1-2-1 소스가 변경된 경우 변경 될 때 마다 bundle.js를 만드는 것이 아니라 메모리로 바로 로딩해버린다.
1-3 아래는 지난 포스트와 동일한 webpack.config.js파일이다.
{
  "name": "react-basic",
  "version": "1.0.0",
  "description": "",
  "main": "index.js",
  "scripts": {
    "build": "webpack --watch",
    "serve": "live-server public/",
    "build-babel": "babel src/app.js --out-file public/scripts/app.js --presets=@babel/preset-env,@babel/preset-react --watch",
    "test": "echo \"Error: no test specified\" && exit 1"
  },
  "author": "",
  "license": "ISC",
  "dependencies": {
    "@babel/cli": "^7.12.1",
    "@babel/core": "^7.12.3",
    "@babel/preset-env": "^7.12.1",
    "@babel/preset-react": "^7.12.1",
    "babel-loader": "^8.1.0",
    "live-server": "^1.2.1",
    "react": "^17.0.1",
    "react-dom": "^17.0.1",
    "webpack": "^5.3.0"
  },
  "devDependencies": {
    "webpack-cli": "^4.1.0"
  }
}
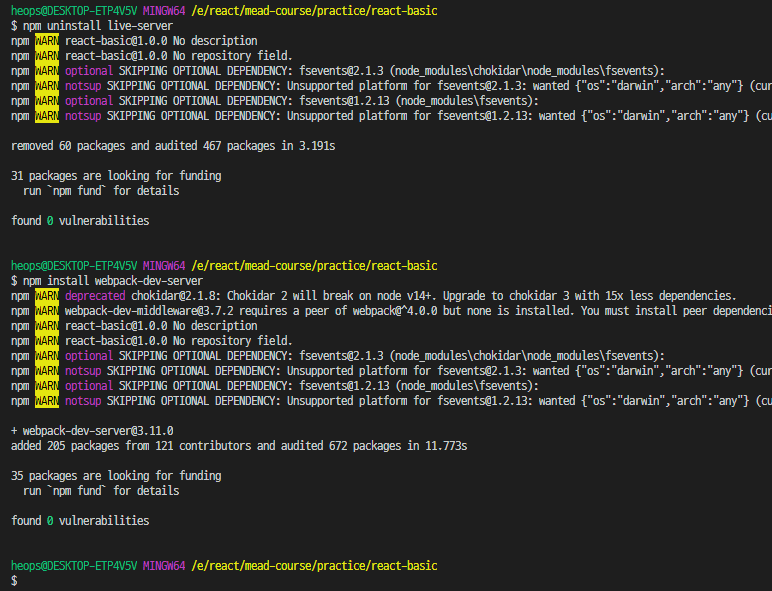
2. 개발 서버를 사용하려면 우선 개발서버를 설치해야 한다.
2-1 아래처럼 live-server를 삭제하고 webpack-dev-server를 설치한다.

2-2 개발서버의 옵션이다.
  devServer: {
    proxy: { // proxy URLs to backend development server
      '/api': 'http://localhost:3000'
    },
    contentBase: path.join(__dirname, 'public'), // boolean | string | array, static file location
    compress: true, // enable gzip compression
    historyApiFallback: true, // true for index.html upon 404, object for multiple paths
    hot: true, // hot module replacement. Depends on HotModuleReplacementPlugin
    https: false, // true for self-signed, object for cert authority
    noInfo: true, // only errors & warns on hot reload
    // ...
  },
2-2-1 여기서 중요한 것은 contentBase인데 어떤 폴더에 실행파일이 위치하는지를 지정한다.
2-2-2 위치는 webpack의 실행 결과 파일을 저장하는 경로를 설정하는 것과 동일한 방식으로 실행폴더를 지정한다.
const path = require('path')

module.exports = {
  entry: './src/app.js',
  output: {
    path: path.join(__dirname, 'public'),
    filename: 'bundle.js'
  },
  module: {
    rules: [
      {
        test: /\.js$/,
        exclude: /node_modules/,
        use: {
          loader: 'babel-loader',
          options: {
            presets: [
              '@babel/preset-env',
              '@babel/preset-react'
            ]
          }
        }
      }
    ]
  },
  devServer: {
    contentBase: path.join(__dirname, 'public')
  }
}
2-2-3 live-server를 삭제했으니 package.json의 scripts에 서버 기동에 대한 코드를 다시 작성한다.
2-2-3-1 두 가지가 변경되었는데, 우선 build 항목에서 --watch가 빠졌다.
2-2-3-1-1 이젠 dev-server 통해서 컴파일하기 때문이다. 즉 실제 파일을 생성하고 싶을 때만 build를 이용한다.
2-2-3-2 두번째는 serve가 webpack serve로 변경되었다. dev-server를 기동하는 코드이다.
2-2-3-2-1 예전 버전에는 dev-server가 webpack-dev-server라는 명령으로 기동했지만 변경되었다.
{
  "name": "react-basic",
  "version": "1.0.0",
  "description": "",
  "main": "index.js",
  "scripts": {
    "build": "webpack",
    "serve": "webpack serve",
    "build-babel": "babel src/app.js --out-file public/scripts/app.js --presets=@babel/preset-env,@babel/preset-react --watch",
    "test": "echo \"Error: no test specified\" && exit 1"
  },
  "author": "",
  "license": "ISC",
  "dependencies": {
    "@babel/cli": "^7.12.1",
    "@babel/core": "^7.12.3",
    "@babel/preset-env": "^7.12.1",
    "@babel/preset-react": "^7.12.1",
    "babel-loader": "^8.1.0",
    "react": "^17.0.1",
    "react-dom": "^17.0.1",
    "webpack": "^5.3.0",
    "webpack-dev-server": "^3.11.0"
  },
  "devDependencies": {
    "webpack-cli": "^4.1.0"
  }
}
2-2-4 위의 코드에서 scripts의 build-babel과 test은 더 이상 필요없다.
{
  "name": "react-basic",
  "version": "1.0.0",
  "description": "",
  "main": "index.js",
  "scripts": {
    "build": "webpack",
    "serve": "webpack serve"
  },
  "author": "",
  "license": "ISC",
  "dependencies": {
    "@babel/cli": "^7.12.1",
    "@babel/core": "^7.12.3",
    "@babel/preset-env": "^7.12.1",
    "@babel/preset-react": "^7.12.1",
    "babel-loader": "^8.1.0",
    "react": "^17.0.1",
    "react-dom": "^17.0.1",
    "webpack": "^5.3.0",
    "webpack-dev-server": "^3.11.0"
  },
  "devDependencies": {
    "webpack-cli": "^4.1.0"
  }
}
3. dev 서버를 사용하게 되면 또 다른 장점이 있는데 debug할 때 문제가 생긴 원래 소스코드의 위치를 알 수 있다.
3-0 소스 맵이란 실행 시점에 어떤 부분에서 문제가 생겼는지를 알 수 있는 지도 같은 것을 말한다.
3-1 아래 캡처를 보면 Todo의 props를 참조할 때 props아닌 propss.todoText로 되어 있다. 즉 잘못된 변수이다.

3-2 문제는 브라우저가 로딩한 bundle.js 파일에서 오류가 발생한 부분을 보여주기 때문에 에러수정에 도움이 안된다.

3-3 devtool 이라는 속성에 eval-cheap-module-source-map이라는 값을 대입해서 소스 맵을 작성하도록 설정한다.
const path = require('path')

module.exports = {
  mode: 'development',
  entry: './src/app.js',
  output: {
    path: path.join(__dirname, 'public'),
    filename: 'bundle.js'
  },
  module: {
    rules: [{
      test: /\.js$/,
      exclude: /node_modules/,
      use: {
        loader: 'babel-loader',
        options: {
          presets: [
            '@babel/preset-env',
            '@babel/preset-react'
          ]
        }
      }
    }]
  },
  devServer: {
    contentBase: path.join(__dirname, 'public'),
    port: 8081
  },
  devtool: 'eval-cheap-module-source-map',
}
3-4 실행 결과
3-4-1 아래를 보면 127 줄에 문제가 있다고 나오는데 return에 들어 있는 게 한 항목이라 적절하게 위치가 나온다.
3-4-2 여기서는 정확도가 올라갔네 정도로 생각할 수 있지만, 컴포넌트가 각 파일에 분리되면 장점이 명확히 보인다.

'Client Technologies > React' 카테고리의 다른 글
| React : proposal-class-properties 사용하기 (0) | 2020.10.29 |
|---|---|
| React : 각 컴포넌트를 각 파일에 분리하여 관리하기 (0) | 2020.10.28 |
| React : webpack으로 React 개발 자동화하기 (0) | 2020.10.28 |
| React : node package.json scripts 속성 사용하기 (0) | 2020.10.28 |
| React : 리액트 컴포넌트 라이프 사이클과 LocalStorage (0) | 2020.10.26 |
- Total
- Today
- Yesterday
- 도커 개발환경 참고
- AWS ARN 구조
- Immuability에 관한 설명
- 자바스크립트 멀티 비동기 함수 호출 참고
- WSDL 참고
- SOAP 컨슈머 참고
- MySql dump 사용법
- AWS Lambda with Addon
- NFC 드라이버 linux 설치
- electron IPC
- mifare classic 강의
- go module 관련 상세한 정보
- C 메모리 찍어보기
- C++ Addon 마이그레이션
- JAX WS Header 관련 stackoverflow
- SOAP Custom Header 설정 참고
- SOAP Custom Header
- SOAP BindingProvider
- dispatcher 사용하여 설정
- vagrant kvm으로 사용하기
- git fork, pull request to the …
- vagrant libvirt bridge network
- python, js의 async, await의 차이
- go JSON struct 생성
- Netflix Kinesis 활용 분석
- docker credential problem
- private subnet에서 outbound IP 확…
- 안드로이드 coroutine
- kotlin with, apply, also 등
- 안드로이드 초기로딩이 안되는 경우
- navigation 데이터 보내기
- 레이스 컨디션 navController
- raylib
- Rest
- 하이버네이트
- Many-To-Many
- 자바
- 매핑
- XML
- 설정하기
- Security
- form
- spring boot
- MYSQL
- 설정
- RestTemplate
- one-to-many
- 스프링
- mapping
- jsp
- Validation
- hibernate
- 로그인
- Angular
- Spring Security
- 외부파일
- WebMvc
- crud
- 상속
- 스프링부트
- login
- one-to-one
- Spring
