티스토리 뷰
Spring Boot + Angular : Shopping Site 만들기 v1 - 서버 기본 설정 - Rest Repository with JPA
Korean Eagle 2020. 5. 28. 09:250. 이 포스트 점층적인 방식으로 작성할 Shopping website 시리즈의 버전 1이다.
0-1 코드 중 설명하지 않고 넘어가는 부분은 이미 이전 포스트에 설명이 있다.
0-2 말그대로 accumulation이다.
1. 순서를 적어보면
1-0 데이터베이스 작성
1-1 서비스 프로젝트 생성
1-2 Entity 설정
1-3 Respository 설정
1-4 클라이언트 프로젝트 생성
1-5 Entity 생성하기
1-6 서비스 작성하기
1-7 컴포넌트 작성하기
1-8 view 작성하기
2. 데이터베이스를 작성한다.
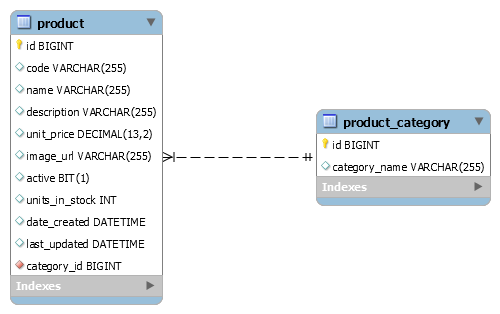
2-1 우선 간단히 제품과 제품 카테고리 테이블 두개를 가지고 시작한다.
2-2 유저를 생성하고 데이터베이스를 생성한다.

3. 프로젝트를 생성한다.
3-1 Visual Studio Code의 Spring Extention Pack을 설치해서 사용한다. 자바 개발에서도 높은 생산성을 보여준다.
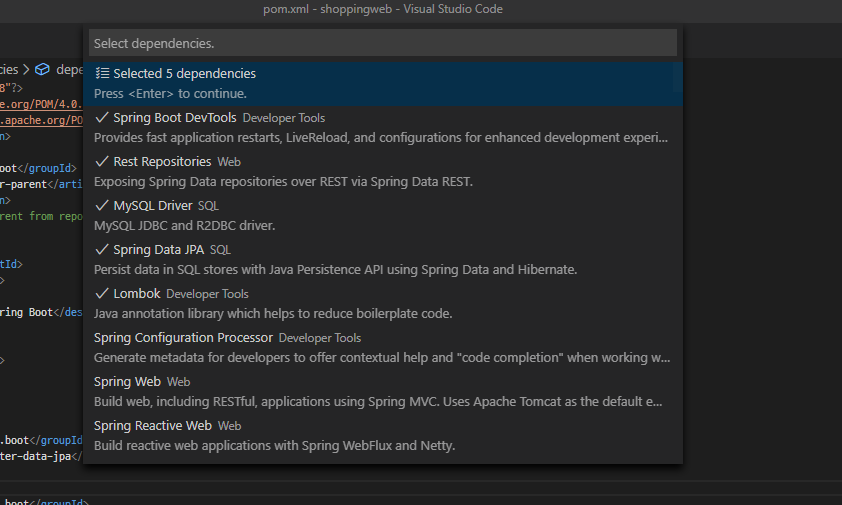
3-2 Dependency는 Rest Repository, Data JPA, MySQL이 중심이고 lombok, devtools는 개발편이을 위해서 추가한다.

4. DB에 매핑되는 Entity 클래스를 생성한다.
4-0 두 클래스의 관계는 양방향이고 Product 쪽에 외래키가 있기 때문에 Product에 JoinColumn 가 있다.
4-1 ProductCategory 소스코드다.
4-2 Product와 서로 소유하는 recursive관계이므로 @Data설정대신, @Setter, @Getter를 사용하였다.
package pe.pilseong.shoppingweb.entity;

import java.util.Set;

import javax.persistence.Column;
import javax.persistence.Entity;
import javax.persistence.GeneratedValue;
import javax.persistence.GenerationType;
import javax.persistence.Id;
import javax.persistence.OneToMany;
import javax.persistence.Table;

import lombok.Getter;
import lombok.Setter;

@Entity
@Table(name = "product_category")
@Getter
@Setter
public class ProductCategory {

  @Id
  @GeneratedValue(strategy = GenerationType.IDENTITY)
  private Long id;

  @Column(name = "category_name")
  private String categoryName;

  @OneToMany(mappedBy = "category")
  private Set<Product> products;
}
4-2 Product
4-2-1 dateCreated, lastUpdated는 timestamp가 들어간다.
4-2-2 Hibernate가 자동으로 값을 넣어주는 @CreationTimestamp, @UpdateTimestamp를 사용한다.
package pe.pilseong.shoppingweb.entity;

import java.math.BigDecimal;
import java.util.Date;

import javax.persistence.Column;
import javax.persistence.Entity;
import javax.persistence.GeneratedValue;
import javax.persistence.GenerationType;
import javax.persistence.Id;
import javax.persistence.JoinColumn;
import javax.persistence.ManyToOne;
import javax.persistence.Table;

import org.hibernate.annotations.CreationTimestamp;
import org.hibernate.annotations.UpdateTimestamp;

import lombok.Data;

@Data
@Entity
@Table(name = "product")
public class Product {

  @Id
  @GeneratedValue(strategy = GenerationType.IDENTITY)
  private Long id;

  @Column
  private String code;

  @Column
  private String name;

  @Column
  private String description;

  @Column(name = "unit_price")
  private BigDecimal unitPrice;

  @Column(name = "image_url")
  private String imageUrl;

  @Column
  private boolean active;

  @Column(name = "units_in_stock")
  private int unitsInStock;

  @Column(name = "date_created")
  @CreationTimestamp
  private Date dateCreated;

  @Column(name = "last_updated")
  @UpdateTimestamp
  private Date lastUpdated;

  @ManyToOne
  @JoinColumn(name = "category_id", nullable = false)
  private ProductCategory category;
}
5. 데이터베이스 접속 설정을 application.properties에 한다.
5-1 현재 작업 중인 MySql이 8버전이서 MySQL8Dialect를 설정했다.
spring.datasource.driver-class-name=com.mysql.cj.jdbc.Driver
spring.datasource.url=jdbc:mysql://localhost:3306/shoppingmall?serverTimezone=Asia/Seoul
spring.datasource.username=shoppingweb
spring.datasource.password=shoppingweb

spring.jpa.show-sql=true
spring.jpa.properties.hibernate.dialect=org.hibernate.dialect.MySQL8Dialect
spring.data.rest.base-path=/api
6. Repository 설정이다.
6-0 두 개의 Entity기 때문에 2개의 Repository가 필요하다.
6-1 ProductRespository
6-1-1 @CrossOrigin 설정이 있는데 Cross Domain Resource Sharing을 허용하는 방법이다.
6-1-2 원래 같은 다른 도메인의 서버와 클라이언트의 통신은 금기시 되는데,
6-1-2-1 특히 브라우저에서 직접 서버로의 접속을 브라우저에서 막고 있다.
6-1-2-2 하지만 서버에서 Http헤더에 CORS를 허용하는 내용을 넣어서 보내주면 브라우저는 이를 허용한다.
package pe.pilseong.shoppingweb.repository;

import org.springframework.data.jpa.repository.JpaRepository;

import pe.pilseong.shoppingweb.entity.Product;

@CrossOrigin(origins = "http://localhost:4200")
public interface ProductRepository extends JpaRepository<Product, Long> {

}
6-2 ProductCategoryRepository
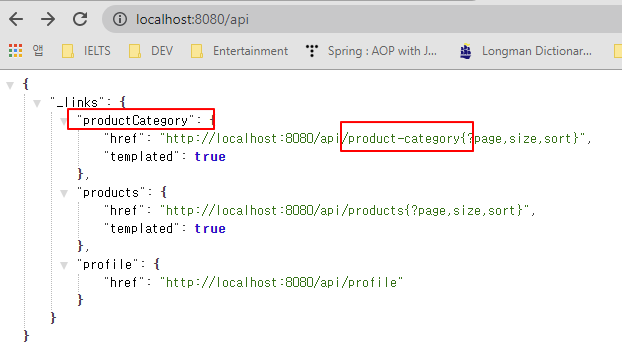
6-2-1 @RepositoryRestResource는 ProductCategory Entity접근 시에 어떤 이름을 사용할지를 지정한다.
6-2-2 collectionResoureRel은 집합에 대한 이름 설정이다. path는 url로 접근 경로에 대한 이름 설정이다.
6-2-2-1 집합 이름이라는 것은 Json의 각 객체의 이름이라고 할 수 있다.
6-2-3 이 부분을 지정하지 않으면 Entity의 복수형이 사용된다. ProductCategories가 된다.
package pe.pilseong.shoppingweb.repository;

import org.springframework.data.jpa.repository.JpaRepository;
import org.springframework.data.rest.core.annotation.RepositoryRestResource;

import pe.pilseong.shoppingweb.entity.ProductCategory;

@RepositoryRestResource(collectionResourceRel = "productCategory", path = "product-category")
public interface ProductCategoryRepository extends JpaRepository<ProductCategory, Long> {

}
7. 서비스를 REST로 접근하면 위의 집합형의 이름과 url을 쉽게 확인할 수 있다.

'Demos > Shopping mall' 카테고리의 다른 글
- Total
- Today
- Yesterday
- 도커 개발환경 참고
- AWS ARN 구조
- Immuability에 관한 설명
- 자바스크립트 멀티 비동기 함수 호출 참고
- WSDL 참고
- SOAP 컨슈머 참고
- MySql dump 사용법
- AWS Lambda with Addon
- NFC 드라이버 linux 설치
- electron IPC
- mifare classic 강의
- go module 관련 상세한 정보
- C 메모리 찍어보기
- C++ Addon 마이그레이션
- JAX WS Header 관련 stackoverflow
- SOAP Custom Header 설정 참고
- SOAP Custom Header
- SOAP BindingProvider
- dispatcher 사용하여 설정
- vagrant kvm으로 사용하기
- git fork, pull request to the …
- vagrant libvirt bridge network
- python, js의 async, await의 차이
- go JSON struct 생성
- Netflix Kinesis 활용 분석
- docker credential problem
- private subnet에서 outbound IP 확…
- 안드로이드 coroutine
- kotlin with, apply, also 등
- 안드로이드 초기로딩이 안되는 경우
- navigation 데이터 보내기
- 레이스 컨디션 navController
- raylib
- XML
- Security
- 자바
- MYSQL
- spring boot
- 설정
- Many-To-Many
- 외부파일
- RestTemplate
- form
- jsp
- 스프링부트
- 스프링
- 상속
- 하이버네이트
- mapping
- Validation
- 로그인
- Rest
- login
- Angular
- crud
- 매핑
- Spring
- WebMvc
- one-to-one
- Spring Security
- one-to-many
- 설정하기
- hibernate
