
티스토리 뷰
Spring Boot + Angular : Shopping Site 만들기 v3 - 2 - 카테고리 내 페이지 설정 - Rest Repository with JPA
Korean Eagle 2020. 5. 31. 00:420. 이 포스트는 카테고리 선택 시 검색된 상품들을 조회할 수 있는 페이지 네비게이션을 구현한다.
1. 순서는
1-1 ProductService 수정
1-2 GetResponseProduct interface 수정
1-3 ProductList Component에 페이지 관련 속성들 추가하기
1-4 ProductList view에 ngb-pagenation을 이용한 네비게이션 연결
2. 스프링 Rest repository를 사용하면 페이지에 대한 정보를 아무 설정없이 사용할 수 있다.
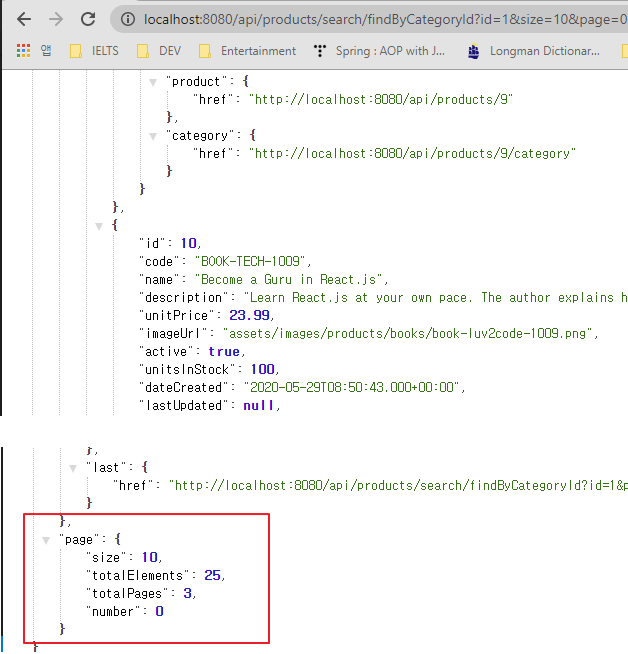
2-1 아래에 캡처처럼 url에 size, page parameter를 추가하여 검색이 가능하다.
2-1-1 page는 읽기를 원하는 쪽수이고 0부터 시작한다. 0이 첫 페이지이다.
2-1-2 size는 한 페이지에 상품이 몇 개가 들어가는지에 대한 정보이다.
2-1-3 아래처럼 맨 아래에 표출된다.
3. ProductService에서 카테고리로 상품을 가져올 때 페이지 정보까지 담아오도록 수정한다.
3-0 페이지 정보를 담기 위한 간단한 클래스를 작성한다.
ng generate class common/PageInfo3-0-1 클래스 속성을 page 구조와 일치하도록 작성한다.
3-0-2 기본값으로 한페이지당 5개, 시작은 첫페이지로 세팅한다.
3-0-2-1 number가 0이 아닌 1인 이유는 ngb-pagination은 첫페지이가 1이기 때문이다. 추후 설명한다.
export class PageInfo {
  constructor(
    public size: number = 5,
    public totalElements: number = 0,
    public totalPages: number = 0,
    public number: number = 1
    ) {}
  }
3-1 우선 매핑 인터페이스를 수정해야 한다.
interface GetResponseProduct {
  _embedded: {
    products: Product[],
  },
  page: {
    size: number,
    totalElements: number,
    totalPages: number,
    number: number
  }
}
3-2 이제 getProductsByCategoryId 메소드를 아래처럼 수정한다.
  getProductsByCategoryId(id: string, page: number, size: number): Observable<GetResponseProduct> {
    const targetUrl = `${this.baseUrl}/products/search/findByCategoryId?id=${id}&page=${page}&size=${size}`

    return this.httpClient.get<GetResponseProduct>(targetUrl)
  }
4. 페이지 정보를 요청하는 ProductList를 수정한다.
4-1 ProductList는 Page정보를 가지고 있어야 하므로 PageInfo 속성을 생성한다.
4-2 ProductService에서 구성한 새로운 메소드를 사용하도록 수정한다.
4-3 중요한 부분은 변경된 메소드의 반환값이 이전의 Product[]이 아닌 GetResponseProduct임을 주의한다.
4-3-1 GetResponseProduct는 상품리스트와 페이지 정보 둘 다 가지고 있다.
4-3-2 요청 시 주어지는 값들 중에 number가 number-1로 되어 있음을 주의한다.
4-3-2-1 UI컴포넌트와의 차이점을 보정한다. 아래에서 설명한다.
4-4 페이지 정보를 화면에 표출할 때 필요한 정보는 총 몇개의 데이터인지와 총 페이지 수이다.
4-4-1 원하는 페이지와 페이지당 표출될 상품수는 데이터를 요청할 때 필요한 정보라 수신할 필요가 없다.
4-4-2 원하는 페이지와 페이지당 상품수는 사용자가 선택할 수 있도록 사용자화면을 구성한다.
4-5 마지막으로 이전 카테고리와 비교하는 부분이 있는데,
4-5-1 이 부분은 카테고리가 변경되어도 경로정보가 라우팅 테이블에서 category/:id/:name 형식으로 동일하므로
4-5-2 생성된 컴포넌트를 재활용하기 때문에 카테고리가 변경되어도 현재 페이지 설정은 변하지 않기 때문이다.
4-5-3 카테고리가 변경되면 보여질 페이지 역시 첫페이지로 변경되어야 한다.
import { Component, OnInit } from '@angular/core';
import { Product } from 'src/app/common/product';
import { ProductService } from 'src/app/services/product.service';
import { ActivatedRoute } from '@angular/router';
import { PageInfo } from 'src/app/common/page-info';

@Component({
  selector: 'app-product-list',
  templateUrl: './product-list.component.html',
  styleUrls: ['./product-list.component.css']
})
export class ProductListComponent implements OnInit {

  products: Product[]

  currentCategoryId: string = '1'
  previousCategoryId: string = '1'

  currentCategoryName: string;

  pageInfo: PageInfo = new PageInfo()

  constructor(private productService: ProductService, private route: ActivatedRoute) { }

  ngOnInit(): void {
    this.route.paramMap.subscribe(
      ()=> this.getProducts()
    )
  }

  getProducts(): void {
    if (this.route.snapshot.paramMap.has("keyword")) {
      this.handleSearchProducts()
    } else {
      this.handleGetProducts()
    }
  }

  private handleSearchProducts() {
    const keyword = this.route.snapshot.paramMap.get("keyword")
    this.currentCategoryName = 'Search: ' + keyword
    this.productService.getProuductsByName(keyword).subscribe(
      data=> this.products = data
    )
  }

  private handleGetProducts() {
    if (this.route.snapshot.paramMap.has("id")) {
      this.currentCategoryId = this.route.snapshot.paramMap.get("id")
      this.currentCategoryName = this.route.snapshot.paramMap.get("name")
    } else {
      this.currentCategoryId = "1"
      this.currentCategoryName = "Books"
    }

    if (this.previousCategoryId !== this.currentCategoryId) {
      this.pageInfo.number = 1
    }
    this.previousCategoryId = this.currentCategoryId

    this.productService.getProductsByCategoryId(this.currentCategoryId,
      this.pageInfo.number-1, this.pageInfo.size).subscribe(data => {
        console.log(data);
        this.products = data._embedded.products

        this.pageInfo.totalElements = data.page.totalElements
        this.pageInfo.totalPages = data.page.totalPages
      }
    )
  }

  onPagechange() {
    this.getProducts()
  }
}
5. 마지막으로 유저 화면을 작성한다.
5-1 변경된 부분은 가장 아래의 nbg-pagination이다. ng-bootstrap에서 제공하는 UI컴포넌트이다.
5-1-1 이 컴포넌트의 속성은 page - number, pageSize - size, collectionSize - totalElements와 매핑된다.
5-1-2 속성 number는 1부터 시작하기 때문에 PageInfo 클래스는 항상 이 컴포넌트 기준으로 작성해야 한다.
5-1-3 이는 요청할 때 사용자가 선택한 정보를 이 컴포넌트에서 발생시키고 그 정보로 요청하기 때문이다.
5-1-4 따라서 서비스 요청시 number는 -1 해준 값을 주어야 한다.
5-1-5 page는 양방향, 나머지는 화면에서 읽어오는 방향으로 설정되었음에 주의한다.
5-1-6 사용자가 페이지 버튼을 누르면 pageChange 이벤트가 발생하는데 이 때 데이터를 재요청하는 함수를 만든다.
5-1-7 maxSize는 페이지 네비게이션의 몇개의 숫자가 표기될 것인지를 설정한다.
5-1-8 boundaryLinks true는 첫페이지, 마지막 페이지에 대한 네이게이션을 추가해 준다.
<div class="container-fluid">
  <h4>{{ currentCategoryName }}</h4>
  <hr>
  <div class="row">
    <table class="table">
      <thead class="thead-dark">
        <th class="text-center">Image</th>
        <th class="text-center">Name</th>
        <th class="text-center">Units in Stock</th>
        <th class="text-center">Price</th>
      </thead>
      <tbody>
        <tr *ngFor="let product of products">
          <td class="text-center">
            <a routerLink="/products/{{product.id}}">
              <img src="{{ product.imageUrl }}" width="50px" alt="picture">
            </a>
          </td>
          <td class="text-center">
            <a routerLink="/products/{{product.id}}">{{ product.name }}</a>
          </td>
          <td class="text-center">{{ product.unitsInStock }}</td>
          <td class="text-center">{{ product.unitPrice | currency }}</td>
        </tr>
      </tbody>
    </table>
  </div>
  <div class="mt-5 d-flex justify-content-center">
    <ngb-pagination
      [(page)]="pageInfo.number"
      [pageSize]="pageInfo.size"
      [collectionSize]="pageInfo.totalElements"
      [maxSize]="5"
      [boundaryLinks]="true"
      (pageChange)="onPagechange()"
    ></ngb-pagination>
  </div>
</div>
6. 실행 화면

'Demos > Shopping mall' 카테고리의 다른 글
- Total
- Today
- Yesterday
- 도커 개발환경 참고
- AWS ARN 구조
- Immuability에 관한 설명
- 자바스크립트 멀티 비동기 함수 호출 참고
- WSDL 참고
- SOAP 컨슈머 참고
- MySql dump 사용법
- AWS Lambda with Addon
- NFC 드라이버 linux 설치
- electron IPC
- mifare classic 강의
- go module 관련 상세한 정보
- C 메모리 찍어보기
- C++ Addon 마이그레이션
- JAX WS Header 관련 stackoverflow
- SOAP Custom Header 설정 참고
- SOAP Custom Header
- SOAP BindingProvider
- dispatcher 사용하여 설정
- vagrant kvm으로 사용하기
- git fork, pull request to the …
- vagrant libvirt bridge network
- python, js의 async, await의 차이
- go JSON struct 생성
- Netflix Kinesis 활용 분석
- docker credential problem
- private subnet에서 outbound IP 확…
- 안드로이드 coroutine
- kotlin with, apply, also 등
- 안드로이드 초기로딩이 안되는 경우
- navigation 데이터 보내기
- 레이스 컨디션 navController
- raylib
- 스프링부트
- Spring Security
- 스프링
- Many-To-Many
- XML
- hibernate
- 외부파일
- spring boot
- 로그인
- Angular
- Rest
- 상속
- login
- MYSQL
- Spring
- 자바
- Validation
- 하이버네이트
- Security
- jsp
- 설정하기
- RestTemplate
- one-to-one
- WebMvc
- crud
- one-to-many
- 설정
- mapping
- 매핑
- form