
티스토리 뷰
Spring Boot + Angular : Shopping Site 만들기 v2 - 1 - REST API 검색기능 추가 및 ID 표출하기 - Rest Repository with JPA
Korean Eagle 2020. 5. 29. 17:571. 이 포스트는 아래 포스트의 v1에 아래의 기능을 추가한 내용이다.
1-1 레이아웃 만들기
1-2 제품 표시하기
1-3 routing 추가하기
1-3 카테고리로 표출하기
1-4 검색기능 추가하기
Spring Boot : Rest Repository with JPA - Shopping Site 만들기 V1 - 1
0. 이 포스트 점층적인 방식으로 작성할 Shopping website 시리즈의 버전 1이다. 0-1 코드 중 설명하지 않고 넘어가는 부분은 이미 이전 포스트에 설명이 있다. 0-2 말그대로 accumulation이다. 1. 순서를 적�
kogle.tistory.com
2. 이 포스트에서는 서버쪽 기능를 구현한다.
2-1 카테고리로 상품을 검색하는 기능 추가
2-2 키워드로 상품을 검색하는 기능 추가
3. 카테고리로 상품을 검색하는 기능
3-1 카테고리로 상품을 검색하려면 카테고리의 id가 필요하다.
3-2 하지만 Data REST는 id를 생략한 데이터만 제공한다.
3-3 물론 추가정보를 통해서 id를 알 수 있지만, 데이터를 파싱해야 사용할 수 있다.
3-4 결국 서버단에서 id를 같이 보내는 것이 가장 바람직하다.
3-4-1 다른 라이브러리와 비슷하게 default method가 구현된 RepositoryRestConfigurer를 상속한 설정클래스 생성
3-4-2 내용이 좀 길어서 exposeId라는 것을 만들었다.
3-4-3 Respository REST 설정자에서 제공하는 exposeIdsFor 메소드를 이용한다.
3-4-3-1 이 메소드가 까다로운 것이 인자로 id를 표출할 entity의 Class타입을 배열로 받는다.
3-4-3-2 어떤 entity가 사용되고 있는지는 EntityManager로 추출할 수 있다.
3-4-3-3 찾은 EntityType의 Set을 stream을 이용하여 getJavaType메소드로 Class 데이터를 추출하여 List를 만들고
3-4-3-4 이 List를 다시 Array로 변경한다. 이 배열을 가지고 exposeIdsFor에 세팅하여 설정을 완료한다.
package pe.pilseong.shoppingweb.config;
import java.util.ArrayList;
import java.util.List;
import java.util.Set;
import javax.persistence.EntityManager;
import javax.persistence.metamodel.EntityType;
import org.springframework.beans.factory.annotation.Autowired;
import org.springframework.context.annotation.Configuration;
import org.springframework.data.rest.core.config.RepositoryRestConfiguration;
import org.springframework.data.rest.webmvc.config.RepositoryRestConfigurer;
@Configuration
public class RestConfig implements RepositoryRestConfigurer {
@Autowired
private EntityManager entityManager;
@Override
public void configureRepositoryRestConfiguration(RepositoryRestConfiguration config) {
exposeIds(config);
}
private void exposeIds(RepositoryRestConfiguration config) {
// fetch entities which are managed by EntityManager
Set<EntityType<?>> entities = entityManager.getMetamodel().getEntities();
List<Class> entityClasses = new ArrayList<>();
// get fully qualifed Class names in a list
entities.stream().forEach(entityType-> entityClasses.add(entityType.getJavaType()));
// collection type conversion
Class[] domainTypes = entityClasses.toArray(new Class[0]);
config.exposeIdsFor(domainTypes);
}
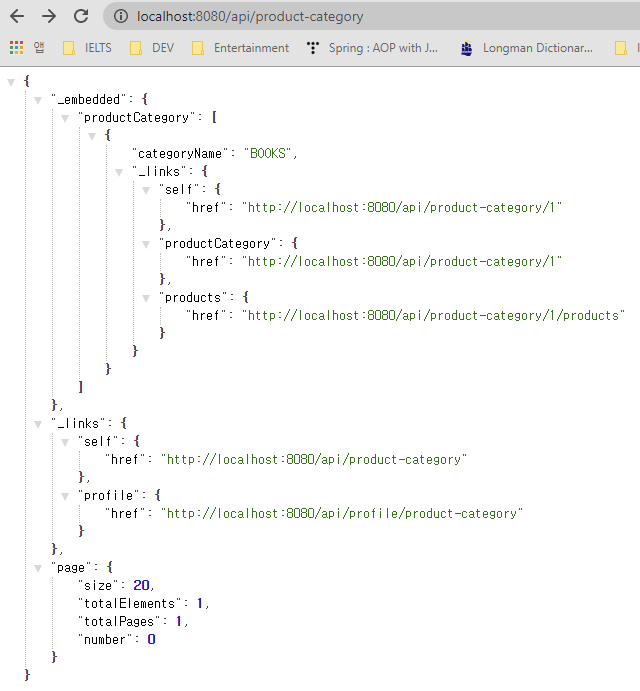
}3-4-4 실행해 보면 등록된 entity는 모두 id를 표출하는 것을 확인할 수 있다.

3-4-5 이 카테고리 정보를 사용하려면 우선 Cross Orign Resouce Sharing를 설정해야 한다.
3-4-5-1 http 프로토콜의 localhost 호스트의 4200포트를 허용한다. 3가지가 각각 적용된다.
package pe.pilseong.shoppingweb.repository;

import org.springframework.data.jpa.repository.JpaRepository;
import org.springframework.data.rest.core.annotation.RepositoryRestResource;
import org.springframework.web.bind.annotation.CrossOrigin;

import pe.pilseong.shoppingweb.entity.ProductCategory;

@RepositoryRestResource(collectionResourceRel = "productCategory", path = "product-category")
@CrossOrigin(origins = "http://localhost:4200")
public interface ProductCategoryRepository extends JpaRepository<ProductCategory, Long> {

}
3-5 이제 id가 있으니 클라이언트에서는 카테고리에 속한 product조회를 편리하게 할 수 있다.
3-5-1 ProductRepository 인터페이스에 카테고리 id로 상품을 조회하는 메소드를 추가한다.
3-5-2 반환하는 Page는 총 상품리스트의 서브리스트인데 종이가 여러장이라면 그 중 한장이라고 생각하면 된다.
3-5-2-1 Pageable이 metadata를 제공하는 interface라면 Page는 각 페이지의 콘텐츠를 제공하는 interface이다.
3-5-3 인자로 들어가는 Pageable는 페이지 번호, 페이지의 크기, offset이나 정렬 방식에 대한 값을 제공한다.
package pe.pilseong.shoppingweb.repository;

import org.springframework.data.domain.Page;
import org.springframework.data.domain.Pageable;
import org.springframework.data.jpa.repository.JpaRepository;
import org.springframework.web.bind.annotation.CrossOrigin;
import org.springframework.web.bind.annotation.RequestParam;

import pe.pilseong.shoppingweb.entity.Product;

@CrossOrigin(origins = "http://localhost:4200")
public interface ProductRepository extends JpaRepository<Product, Long> {

  Page<Product> findByCategoryId(@RequestParam("id") Long id, Pageable pageable);
}
3-5-4 이렇게 설정하면 접근 경로는
# search/메소드이름?reqparam=value 형식이 된다.

http://localhost:8080/api/products/search/findByCategoryId?id=2
3-5-5 결과화면이다.

4. 이제 제품의 이름으로 검색하는 기능을 추가한다.
4-1 Query의 LIKE '%keyworkd%' 의 형식의 검색과 같다.
4-2 메소드를 추가한다.
package pe.pilseong.shoppingweb.repository;
import org.springframework.data.domain.Page;
import org.springframework.data.domain.Pageable;
import org.springframework.data.jpa.repository.JpaRepository;
import org.springframework.web.bind.annotation.CrossOrigin;
import org.springframework.web.bind.annotation.RequestParam;
import pe.pilseong.shoppingweb.entity.Product;
@CrossOrigin(origins = "http://localhost:4200")
public interface ProductRepository extends JpaRepository<Product, Long> {
Page<Product> findByCategoryId(@RequestParam("id") Long id, Pageable pageable);
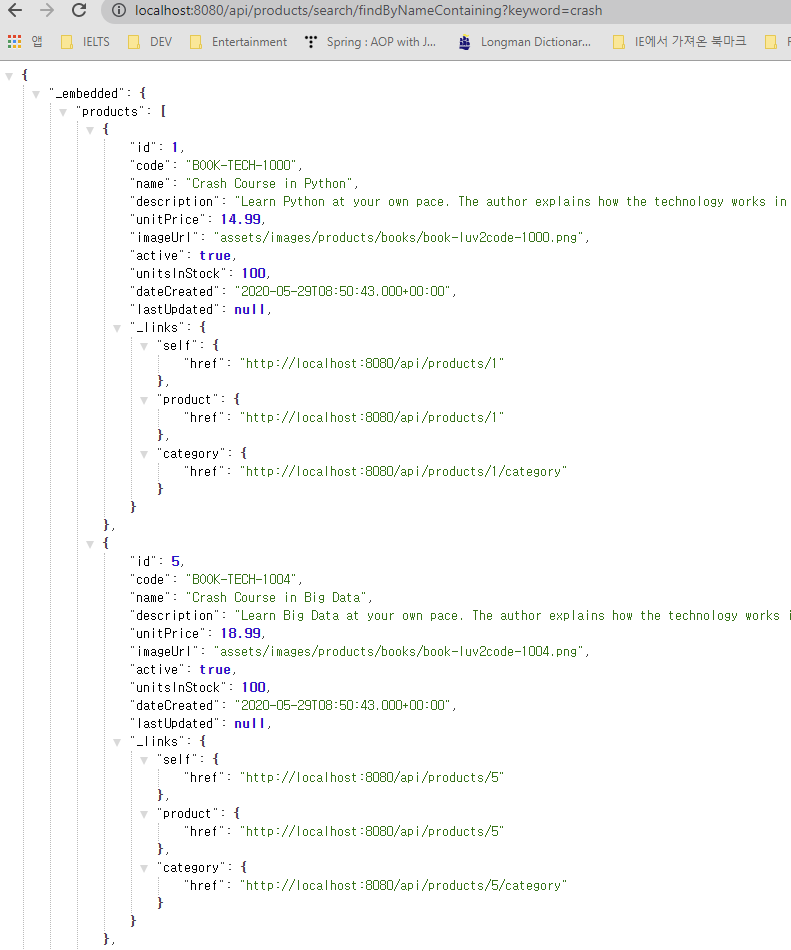
Page<Product> findByNameContaining(@RequestParam("keyword") String keyword, Pageable pageable);
}4-3 접근경로는
http://localhost:8080/api/products/search/findByNameContaining?keyword=crash4-4 결과 화면
'Demos > Shopping mall' 카테고리의 다른 글
- Total
- Today
- Yesterday
- 도커 개발환경 참고
- AWS ARN 구조
- Immuability에 관한 설명
- 자바스크립트 멀티 비동기 함수 호출 참고
- WSDL 참고
- SOAP 컨슈머 참고
- MySql dump 사용법
- AWS Lambda with Addon
- NFC 드라이버 linux 설치
- electron IPC
- mifare classic 강의
- go module 관련 상세한 정보
- C 메모리 찍어보기
- C++ Addon 마이그레이션
- JAX WS Header 관련 stackoverflow
- SOAP Custom Header 설정 참고
- SOAP Custom Header
- SOAP BindingProvider
- dispatcher 사용하여 설정
- vagrant kvm으로 사용하기
- git fork, pull request to the …
- vagrant libvirt bridge network
- python, js의 async, await의 차이
- go JSON struct 생성
- Netflix Kinesis 활용 분석
- docker credential problem
- private subnet에서 outbound IP 확…
- 안드로이드 coroutine
- kotlin with, apply, also 등
- 안드로이드 초기로딩이 안되는 경우
- navigation 데이터 보내기
- 레이스 컨디션 navController
- raylib
- 하이버네이트
- MYSQL
- 설정
- one-to-many
- Many-To-Many
- RestTemplate
- 매핑
- Security
- crud
- 스프링
- form
- spring boot
- one-to-one
- Angular
- Rest
- 로그인
- 외부파일
- Spring
- mapping
- WebMvc
- 스프링부트
- Spring Security
- XML
- jsp
- hibernate
- 설정하기
- 상속
- Validation
- login
- 자바