티스토리 뷰
1. 이 포스트는 RxJS와 XSS와 관련된 시리즈의 연속포스트이다. 이전 포스트를 봐야 이해될 거다
Angular RxJS, XSS 관련 예제 - 1. 환경설정
1. 포스트는 RxJS와 XSS 공격관련하여 몇 가지를 정리한 시리즈이다. 2. 순서 2-1 프로젝트 환경설정 2-2 RxJS 2-3 XSS 3 환경설정 3-1 wikipedia api를 사용하여 검색하는 간단한 예제이다. 3-1-1 위키피디아 검
kogle.tistory.com
2. wki 서비스를 작성한다.
2-1 지난 포스트에 아주 간단한 껍데기를 만들었으니 이제 데이터를 가져와야 한다.
2-2 순서는 다음과 같다.
2-2-1 HttpClientModule을 app.module.ts에 import 한다.
2-2-2 wiki.service.ts를 작성한다.
2-2-3 검색, 서비스, 페이지를 연결한다.
3. HttpClientModule import
3-1 app.module.ts 파일
import { BrowserModule } from '@angular/platform-browser';
import { NgModule } from '@angular/core';
import { HttpClientModule } from '@angular/common/http'

import { AppComponent } from './app.component';
import { NgbModule } from '@ng-bootstrap/ng-bootstrap';
import { SearchComponent } from './search/search.component';
import { PageComponent } from './page/page.component';

@NgModule({
  declarations: [
    AppComponent,
    SearchComponent,
    PageComponent
  ],
  imports: [
    BrowserModule,
    NgbModule,
    HttpClientModule
  ],
  providers: [],
  bootstrap: [AppComponent]
})
export class AppModule { }
4. 우선 간단하게 wiki service를 작성한다.
4-1 params부분은 wikipedia 예제 페이지에 있는 것을 그대로 가져와서 사용하였다.
4-1-1 가장 중요한 부분이 srsearch인데 검색어가 들어가는 부분이다. 받아온 keyword를 사용한다.
4-2 다른 점은 origin인데 '*' 로 설정되어 있다. wiki 찾아보면 이렇게 하라고 되어 있다. 안해도 된다.
4-3 pluck는 소스 데이터에서 특정부분을 추출하여 return해 준다.
4-3-1 아래의 경우는 전체 데이터에서 query 객체 내의 search 객체만을 뽑아서 반환한다.
import { Injectable } from '@angular/core';
import { HttpClient } from '@angular/common/http';
import { pluck } from 'rxjs/operators'
import { Observable } from 'rxjs';
import { WikiItem } from './wiki-item';

@Injectable({
  providedIn: 'root'
})
export class WikiService {

  url = "https://en.wikipedia.org/w/api.php"

  constructor(private http: HttpClient) { }

  search(keyword: string): Observable<WikiItem[]> {
    return this.http.get(this.url, {
      params: {
        action: "query",
        list: "search",
        srsearch: keyword,
        format: "json",
        origin: '*'
      }
    }).pipe(
      pluck('query', 'search')
    )
  }
}
4-3 Observable에서 보내는 타입을 따로 정의하였다. page에서 보여줄 정보를 여기에 다 담는다.
export class WikiItem {
    pageid: number
    title: string
    wordcount: number
    snippet: string
}
5. 서비스를 이용하도록 나머지 소스를 변경한다.
5-0 순서는 다음과 같다.
5-0-1 search 컴포넌트에서 값을 읽어 app 컴포넌트로 보내고
5-0-2 app 컴포넌트에서는 그 키워드를 가지고 wiki 서비스로 검색을 요청한다.
5-0-3 app 컴포넌트에서 검색결과를 받아서 page 컴포넌트로 넘겨주어 표출하게 한다.
5-1 search에서 app으로 값을 보내는 부분은 자식이 부모에게 값을 전달하므로 @Output EventEmitter를 사용한다.
5-1-1 search template에 입력할 때 마다 값을 보내도록 이벤트에 연결한다.
<div class="form-group">
  <input type="text" class="form-control" (input)="onInputChange($event.target.value)">
</div>
5-1-2 search 클래스 onInputChange() 메소드안에서 search 이벤트로 입력된 값을 부모에게 전달한다.
import { Component, OnInit, Output, EventEmitter } from '@angular/core';

@Component({
  selector: 'app-search',
  templateUrl: './search.component.html',
  styleUrls: ['./search.component.css']
})
export class SearchComponent implements OnInit {

  @Output() search = new EventEmitter<string>()

  constructor() { }

  ngOnInit(): void { }

  onInputChange(keyword) {
    this.search.emit(keyword)
  }
}
5-2 app template에서 search 이벤트를 값을 받아 wiki 서비스로 검색을 요청한다.
5-2-1 search 이벤트를 () 구문으로 수신하여 search 메소드에 받은 event값을 인자로 하여 호출한다.
<div class="container">
  <app-search (search)="search($event)"></app-search>
  <app-page [wikiItems]="wikiItems"></app-page>
</div>
5-2-2 app 클래스의 search 메소드는 생성자에서 주입받은 wiki서비스를 이용하여 검색을 요청한다.
5-2-3 요청 결과로 Observable<WikiItem[]>을 반환받고 이 객체를 구독하여 결과값을 wikiItems에 저장한다.
import { Component } from '@angular/core';
import { WikiService } from './wiki.service';
import { WikiItem } from './wiki-item';

@Component({
  selector: 'app-root',
  templateUrl: './app.component.html',
  styleUrls: ['./app.component.css']
})
export class AppComponent {

  wikiItems: WikiItem[] = []

  constructor(private wikiService: WikiService) {}

  search(keyword) {
    this.wikiService.search(keyword).subscribe(
      response=> this.wikiItems = response
    )
  }
}
5-2-4 수신한 wikiItems 배열은 app template을 통해 page컴포넌트러 결과값을 로 전달한다.
<div class="container">
  <app-search (search)="search($event)"></app-search>
  <app-page [wikiItems]="wikiItems"></app-page>
</div>
5-3 page 컴포넌트 클래스는 app 컴포넌트에서 보낸 값을 @Input으로 수신한다.
import { Component, OnInit, Input } from '@angular/core';
import { WikiItem } from '../wiki-item';

@Component({
  selector: 'app-page',
  templateUrl: './page.component.html',
  styleUrls: ['./page.component.css']
})
export class PageComponent implements OnInit {

  @Input() wikiItems: WikiItem[] = []

  constructor() { }

  ngOnInit(): void {
  }
}
5-3-1 이렇게 수신한 wikiItems 배열을 page template을 통해 표출한다.
5-3-1-1 제목은 해당 페이지 링크를 걸었는데, 새창에서 열리고 pageid값으로 페이지를 연결하였다.
<table class="table table-striped text-center">
  <thead class="thead-light">
    <th>제목</th>
    <th>글자수</th>
    <th>내용</th>
  </thead>
  <tbody>
    <tr *ngFor="let item of wikiItems">
      <td>
        <a target="_blank" href="http://en.wikipedia.org/?curid={{item.pageid}}">
          {{ item.title }}
        </a>
      </td>
      <td>{{ item.wordcount }}</td>
      <td>{{ item.snippet }}</td>
    </tr>
  </tbody>
</table>
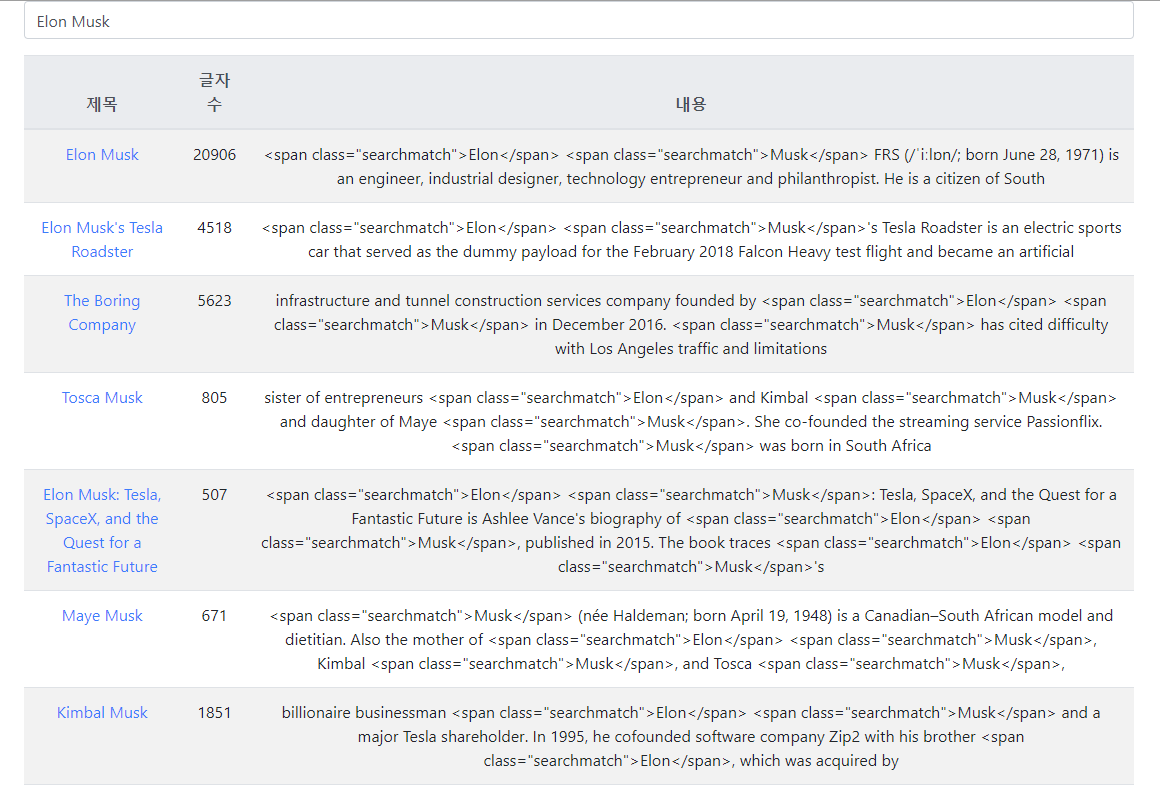
6. 결과값
6-1 아래처럼 결과가 표출된다. 그런데 내용을 보면 html테그가 그대로 보인다.
6-2 html테그가 그대로 보이는 것은 XSS내용에서 작성할 거다.

'Client Technologies > Angular' 카테고리의 다른 글
| Angular : RxJS, XSS 관련 예제 4. XSS 설명 (0) | 2020.06.17 |
|---|---|
| Angular : RxJS, XSS 관련 예제 3. RxJS 설명 (0) | 2020.06.16 |
| Angular RxJS, XSS 관련 예제 - 1. 환경설정 (0) | 2020.06.16 |
| Angular : Modal 만들기 (0) | 2020.06.14 |
| Angular : Children 라우팅 설정하기 - tab component 만들기 (0) | 2020.06.14 |
- Total
- Today
- Yesterday
- 도커 개발환경 참고
- AWS ARN 구조
- Immuability에 관한 설명
- 자바스크립트 멀티 비동기 함수 호출 참고
- WSDL 참고
- SOAP 컨슈머 참고
- MySql dump 사용법
- AWS Lambda with Addon
- NFC 드라이버 linux 설치
- electron IPC
- mifare classic 강의
- go module 관련 상세한 정보
- C 메모리 찍어보기
- C++ Addon 마이그레이션
- JAX WS Header 관련 stackoverflow
- SOAP Custom Header 설정 참고
- SOAP Custom Header
- SOAP BindingProvider
- dispatcher 사용하여 설정
- vagrant kvm으로 사용하기
- git fork, pull request to the …
- vagrant libvirt bridge network
- python, js의 async, await의 차이
- go JSON struct 생성
- Netflix Kinesis 활용 분석
- docker credential problem
- private subnet에서 outbound IP 확…
- 안드로이드 coroutine
- kotlin with, apply, also 등
- 안드로이드 초기로딩이 안되는 경우
- navigation 데이터 보내기
- 레이스 컨디션 navController
- raylib
- form
- jsp
- 상속
- MYSQL
- 하이버네이트
- Angular
- Many-To-Many
- 매핑
- 로그인
- 설정
- 설정하기
- login
- one-to-many
- Spring Security
- Rest
- 스프링부트
- hibernate
- 스프링
- Security
- Validation
- 자바
- XML
- RestTemplate
- Spring
- crud
- WebMvc
- one-to-one
- 외부파일
- spring boot
- mapping
